Settings
**NOTE:** This page contains information that will be valid from the **15th of June 2023.**.
Until then, if you need any help, please reach out to us at **support@juno.one**.
Before you start working with juno.one, yo u need to define basic work entities such as users, teams, and set up roles with permissions.
In the Settings tab you can create, edit and manage users, teams and roles depending on the project or assignment. There are two types of Roles: Team roles and Specific roles. We will go over them and their differences in detail later.
Users and Teams can be configured in the Users & Teams menu item.
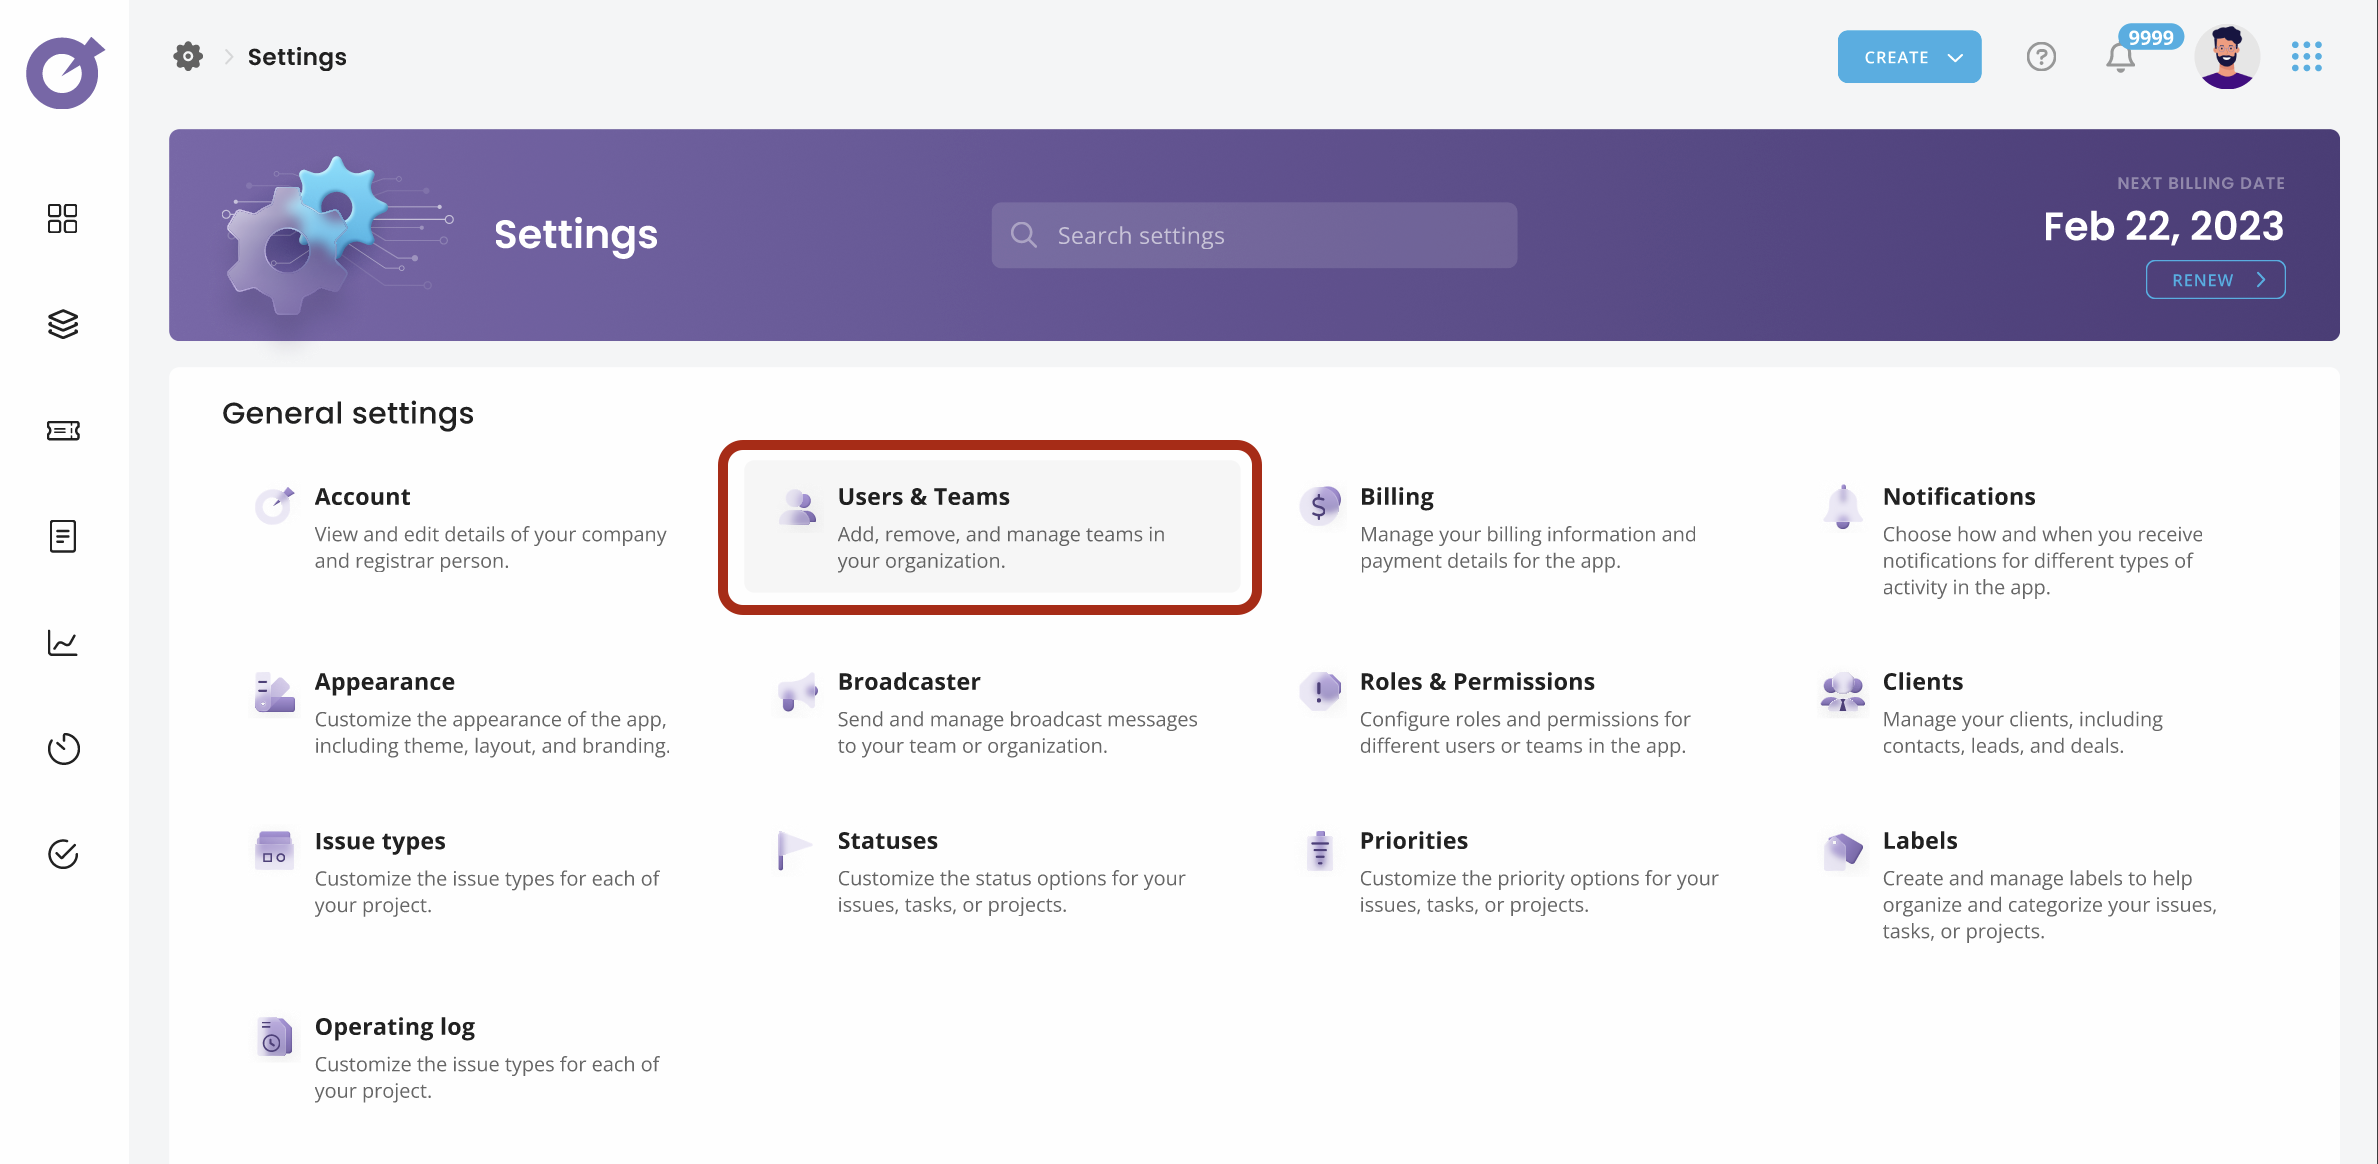
Users
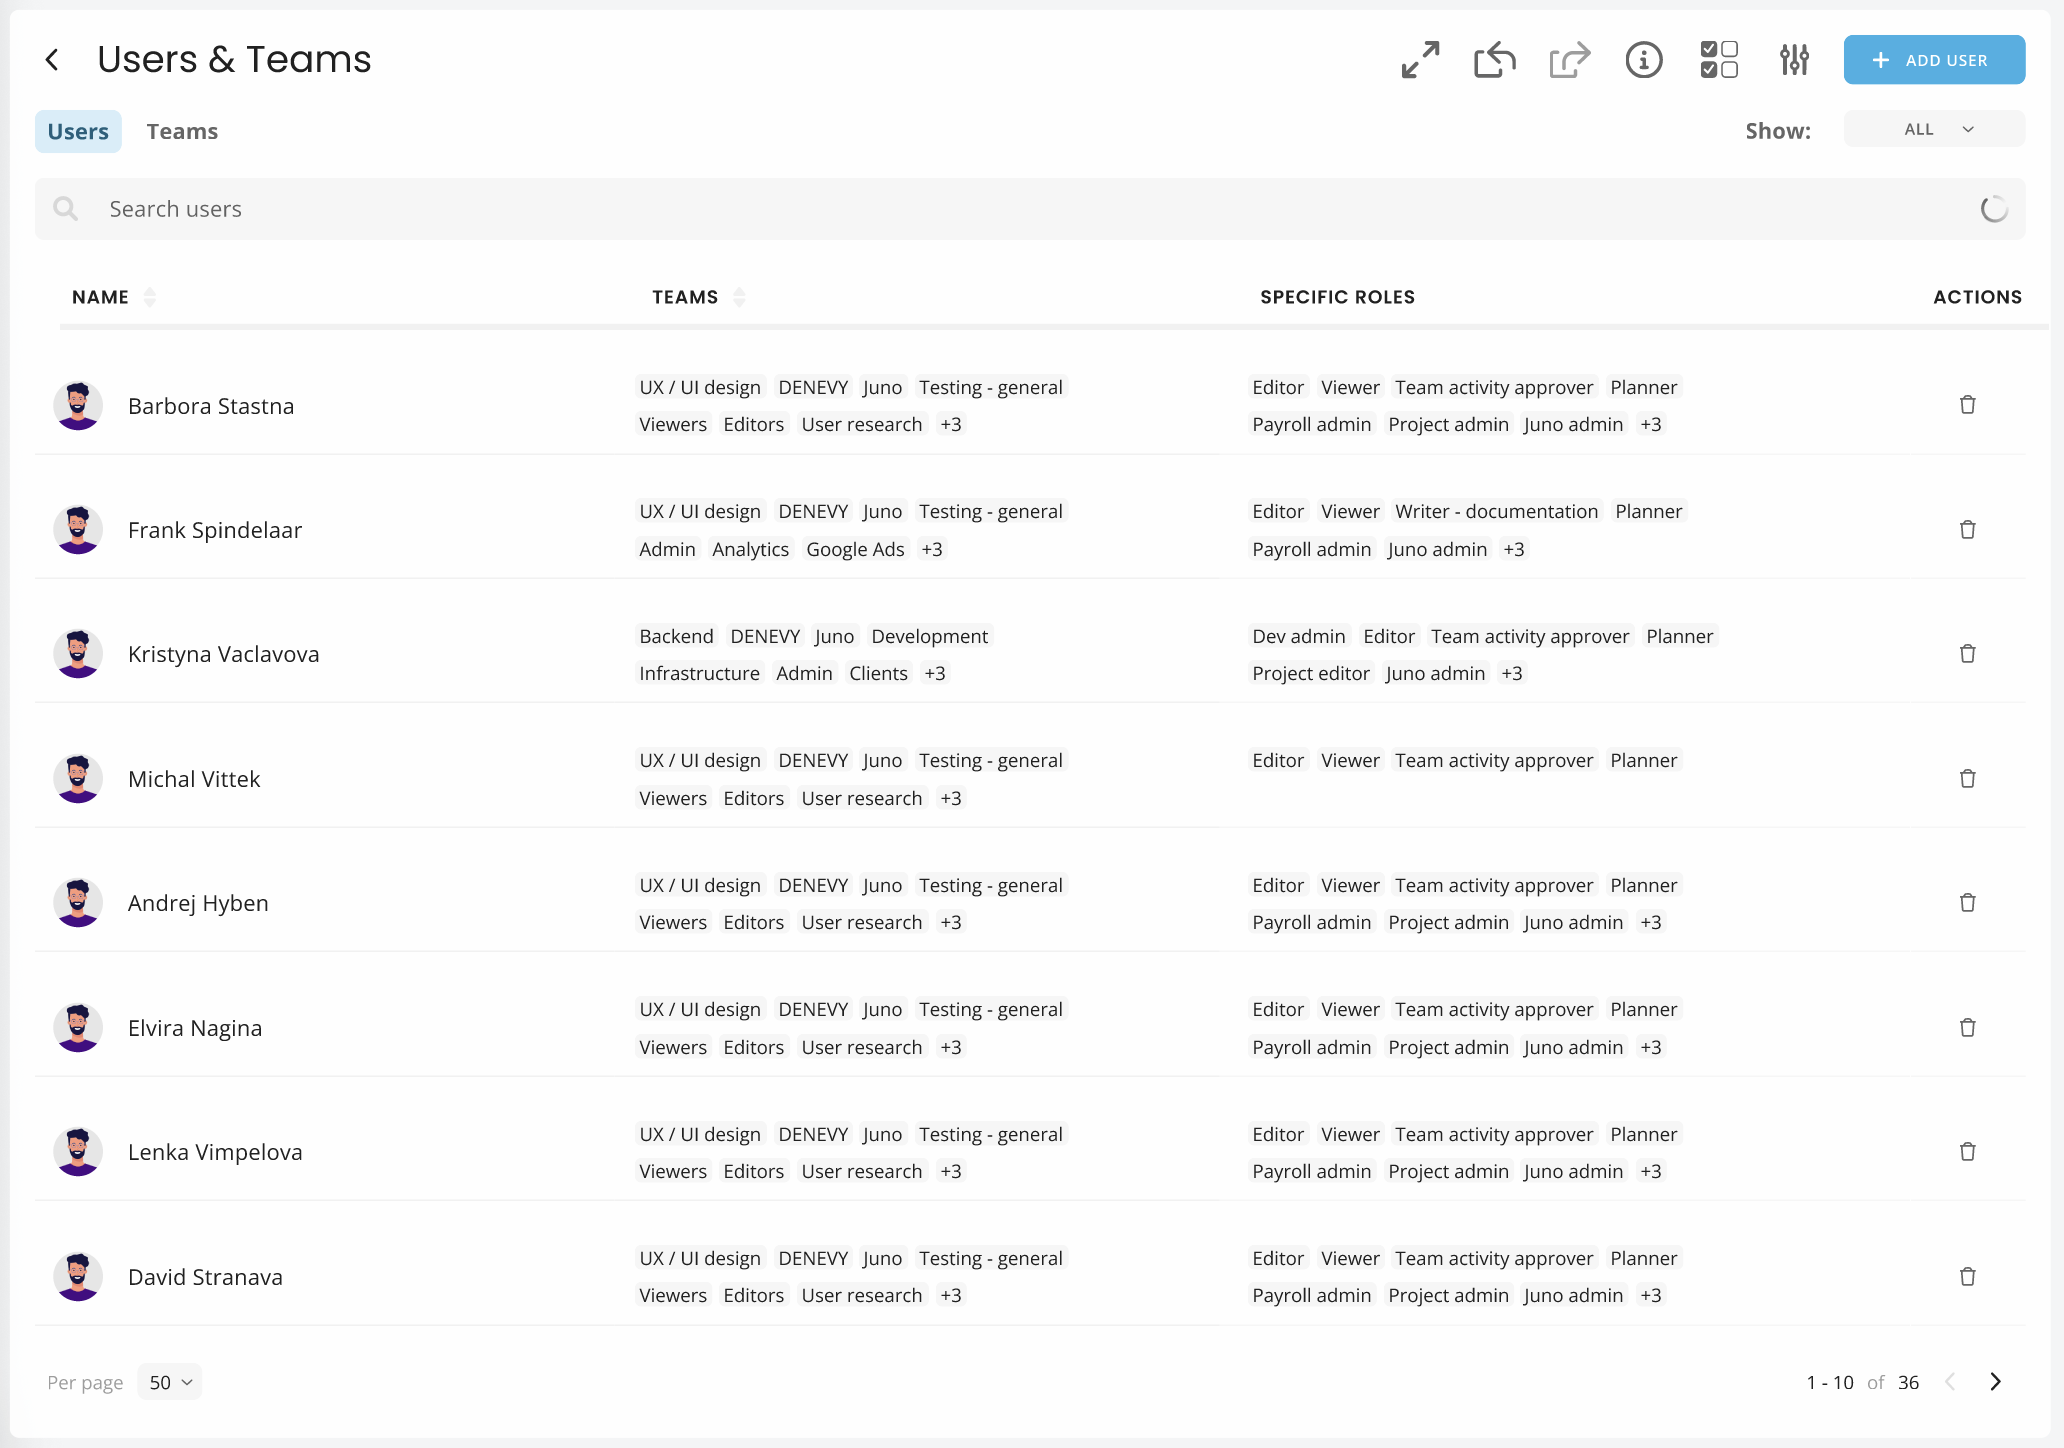
Once the Users & Teams item is selected, within the Users tab the user can see the list of all created users, the teams they've been assigned to, and their specific roles. It is possible to search / filter users through the Search bar and create new users through the + Add user button or bulk import.
Creating a new user
A new user can be added by clicking on the + Add user button in the top right corner of the screen. The user with dedicated rights would be able to add the user to a team and assign team roles, as well as assign specific roles.
With no user-edit and user-create permissions, you can only view the user detail, but can't make any adjustments.
To confirm the inputs, hit the Create button. Note: the "Create" button is enabled once all the mandatory fields are filled in correctly. The following pop-up will appear:
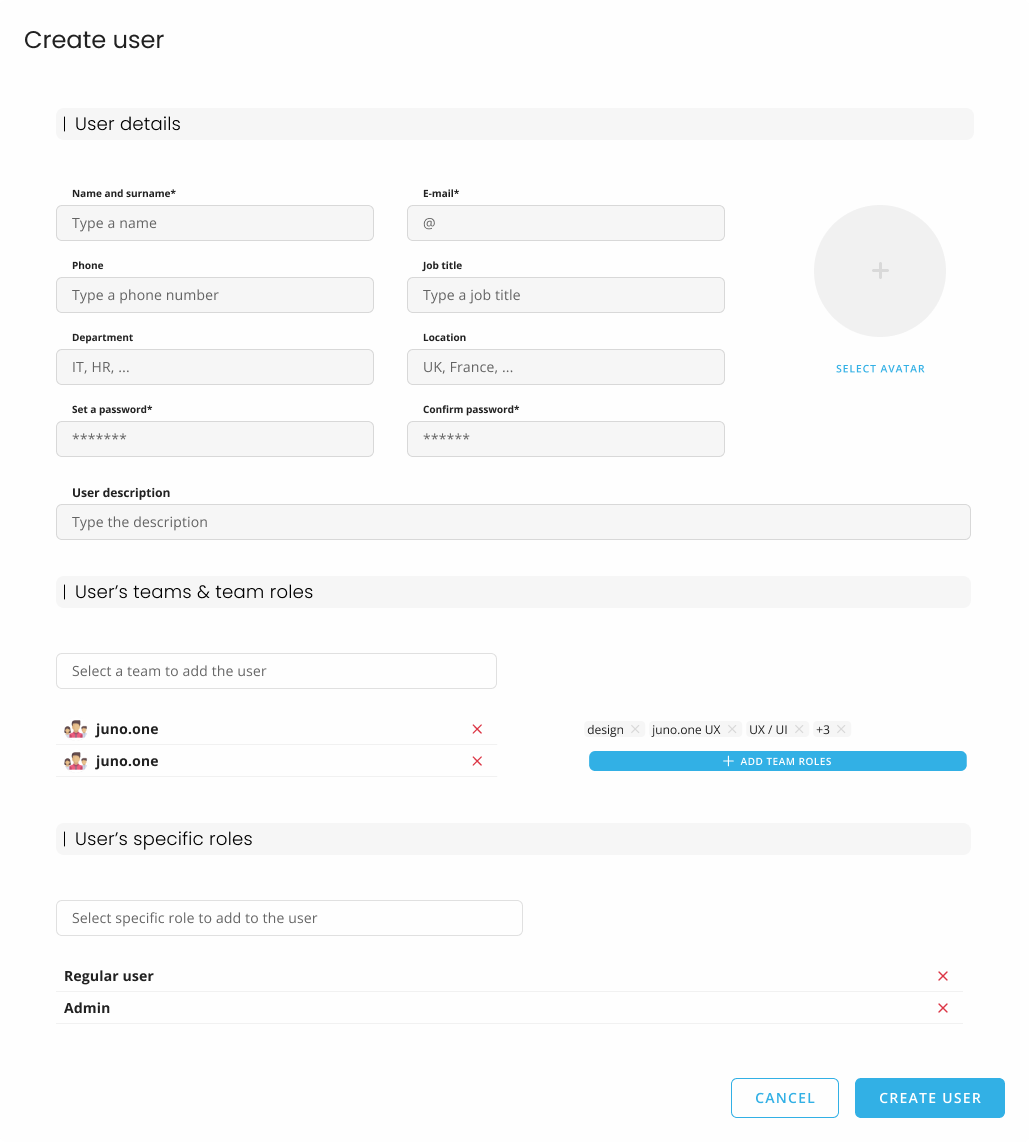
In the User details section, you are required to fill in the following info:
- Name and surname (mandatory)
- E-mail (mandatory)
- Phone, job title, location and department (non-mandatory)
- Set a password (mandatory)
- User description (non-mandatory)
In the User's teams & team roles, you can choose the teams you want to add the user to, and assign the required team roles to the user. More on team roles here.
In the User's specific roles, you can assign specific roles to the new user. More on specific roles here.
Note: You can always add teams and roles to the user later. However, if you choose not to add the new user to any teams and not assign any roles, the user will not have access to anything in juno.one.
Editing a user
By clicking on the user's name or selecting the Edit action on the right side of the user line, a side window will open where you can adjust all information about the user.
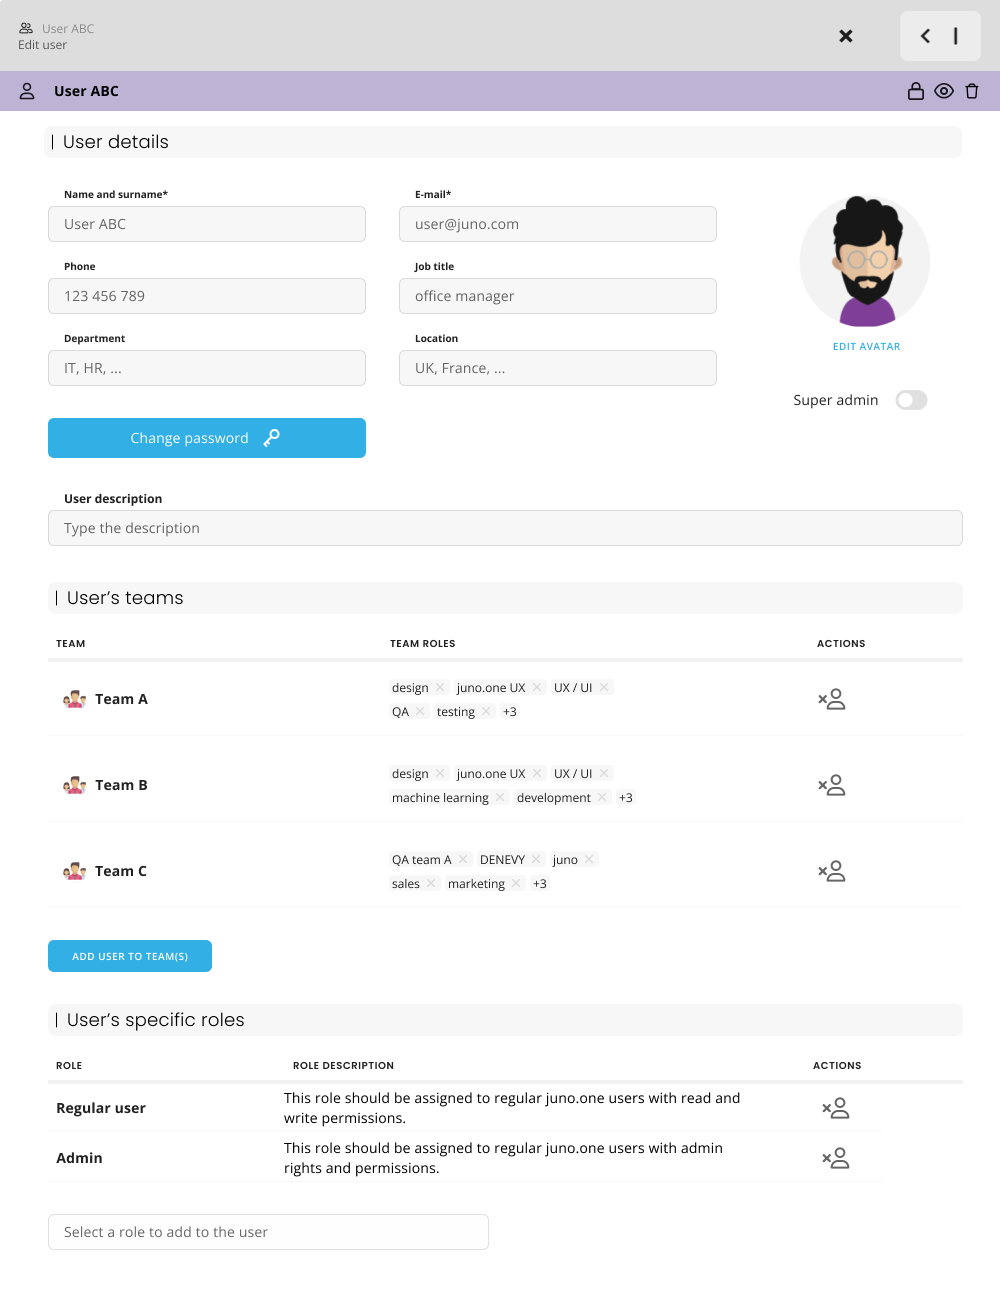
The adjustable information is the same as when creating a user, but there are a few extra options:
- Make super admin: A super admin can grant another user with the role of super admin, granting them access to all features of juno.one, regardless of the user's team roles and specific roles.
- Lock / Unlock: By clicking on the Lock icon in the upper right corner of the side window, you'll be able to lock / unlock the user (prevent them from accessing and using their account).
- Impersonate: Also called "view as", allows you to browse juno.one as the particular user. Useful for checking their access and permissions.
- Delete: By clicking on the Bin icon in the upper right corner, you can delete the user from juno.one. Note that the user will not be hard deleted - you will be able to display their profile if you choose "Show deleted" in the User tab table view.

Import users
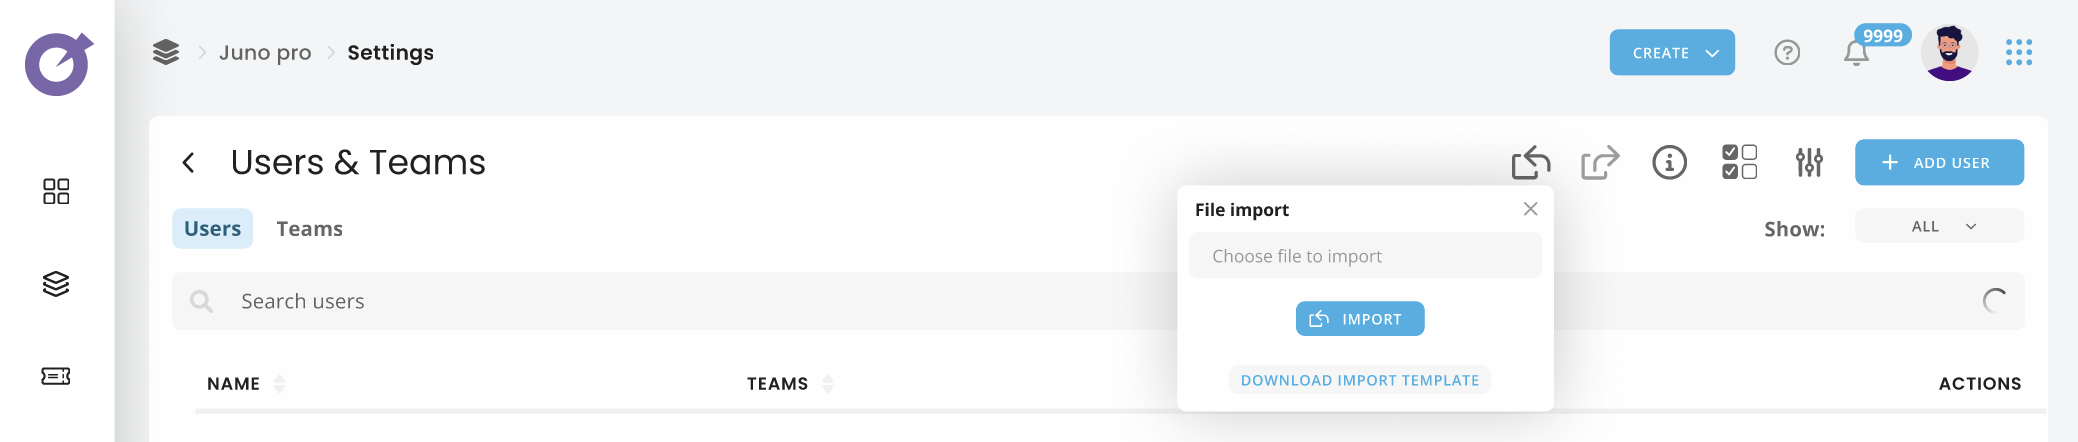
It is possible to bulk import your own list of users by uploading an Excel sheet with all the necessary information. Juno.one provides you with an XLS template that needs to be used for the bulk import:
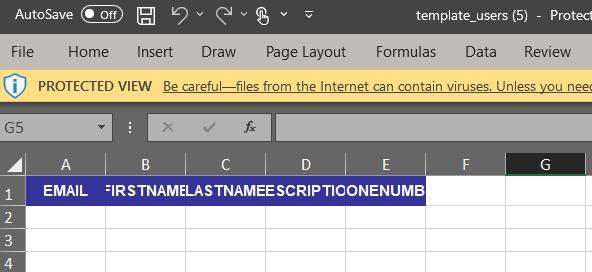
Once you fill in the template with your required data and upload it to juno.one, all the users will be created and you'll be able to work with them further.
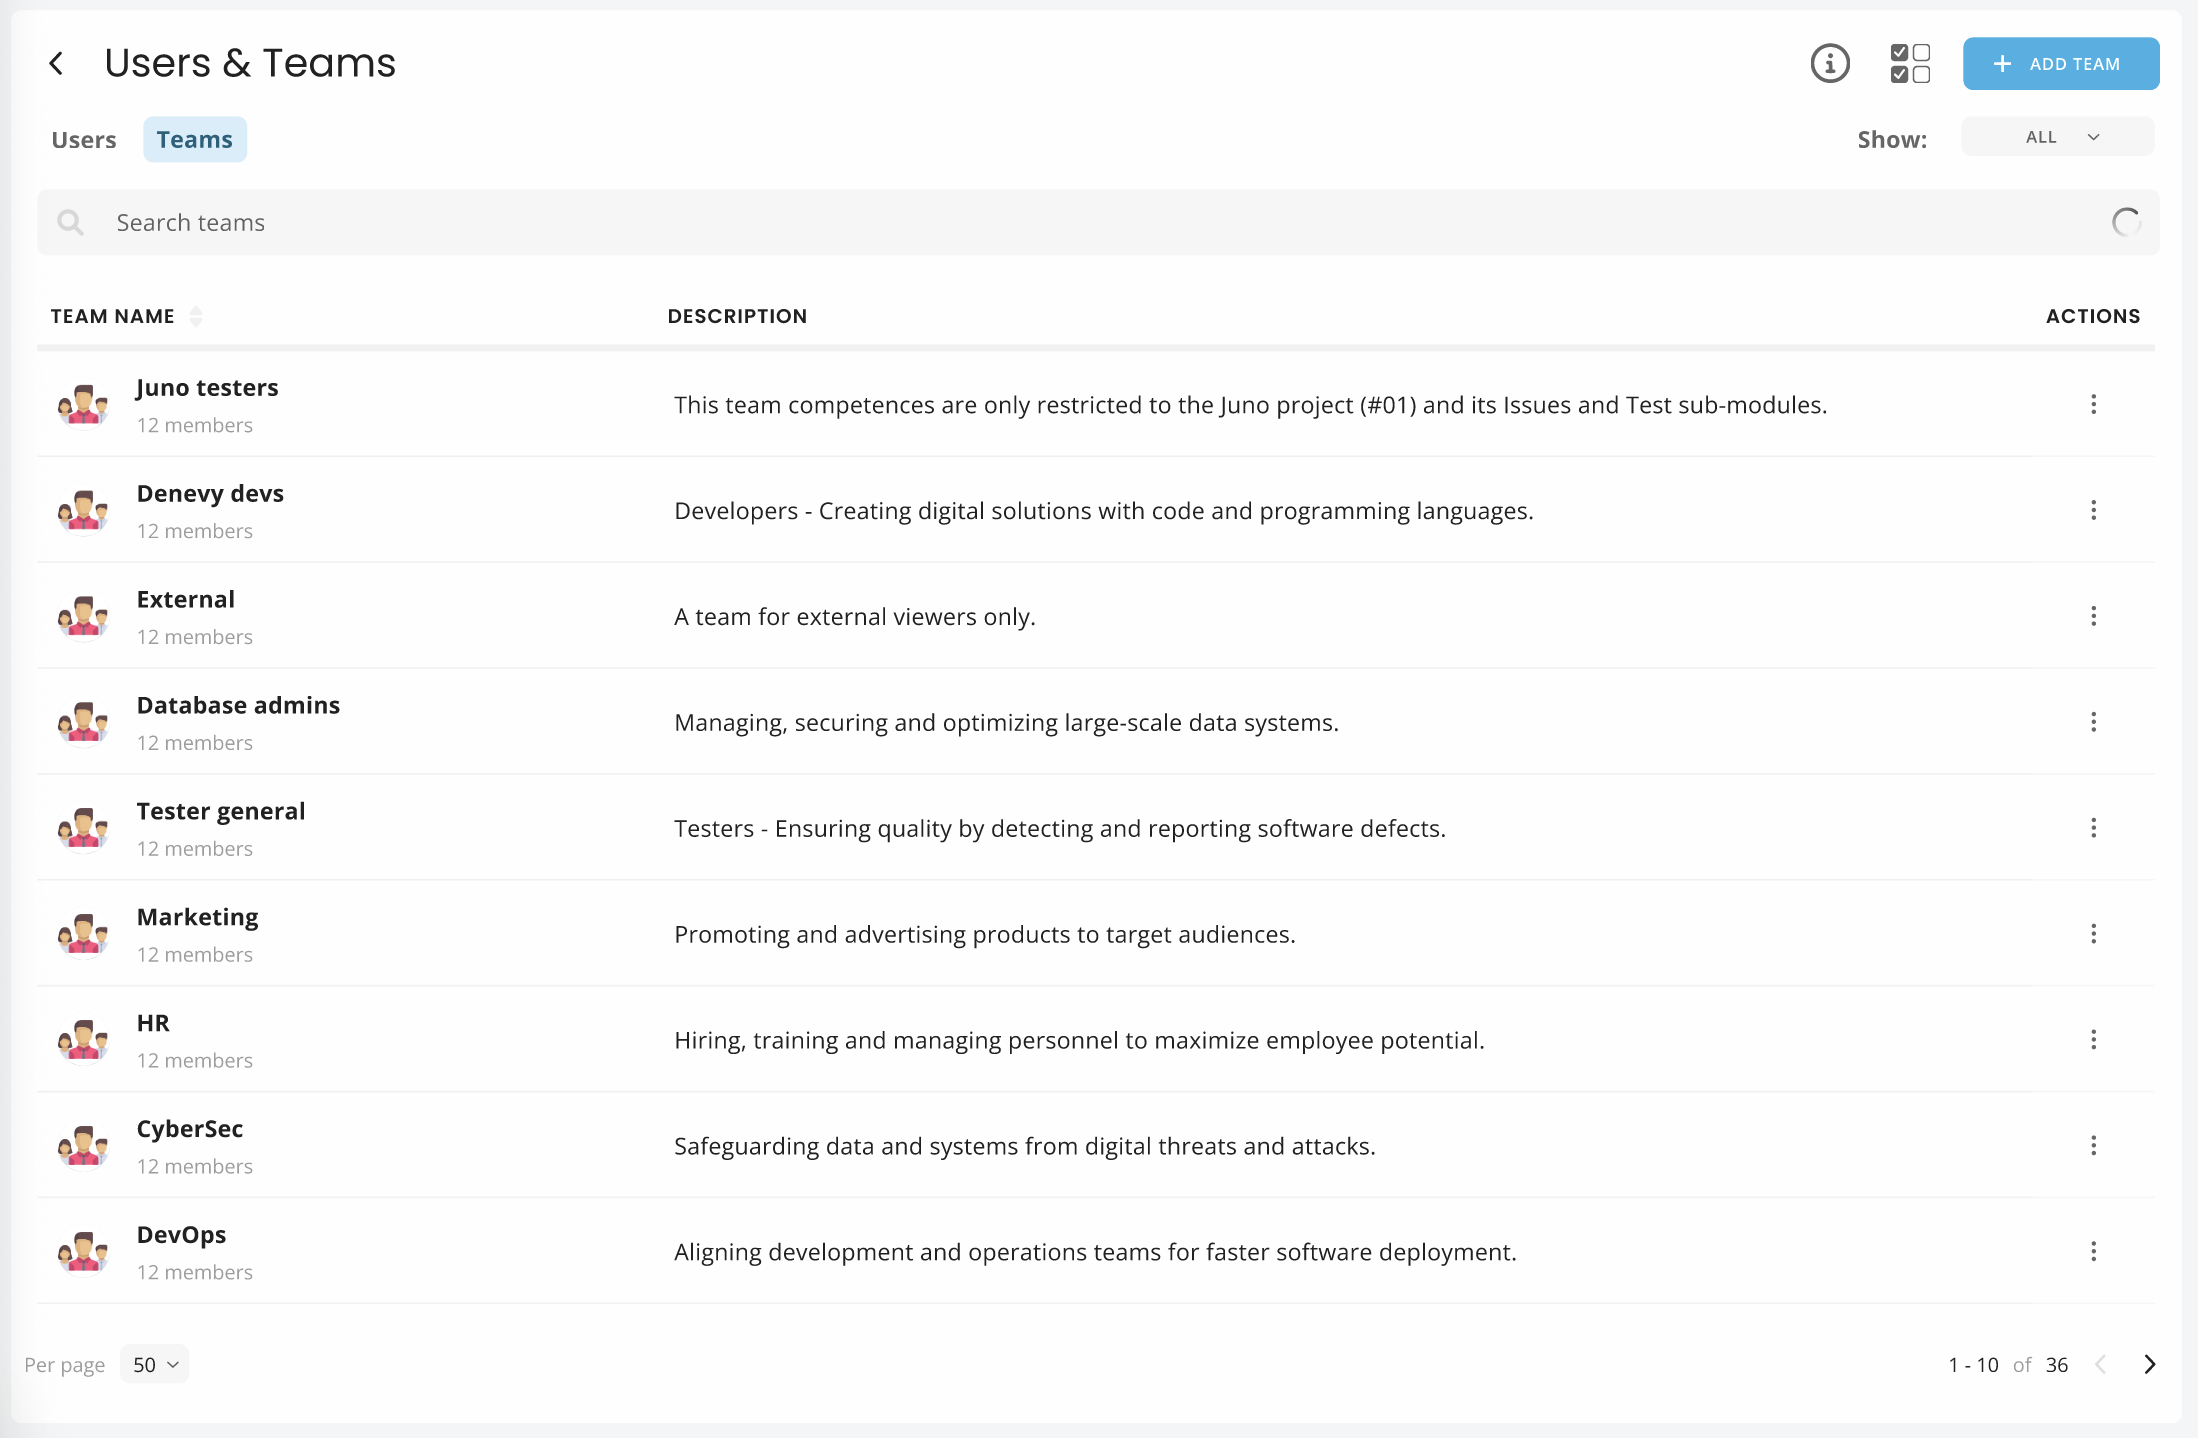
Teams
Within the Teams tab, you can create a new team (through the add team button), search / filter and display all available Teams (through the search field), see Team name and its short description.
Creating a Team
As a user with the specific rights, go to the Teams section and select the “+ Add Team” button. The following pop-up window will be displayed.
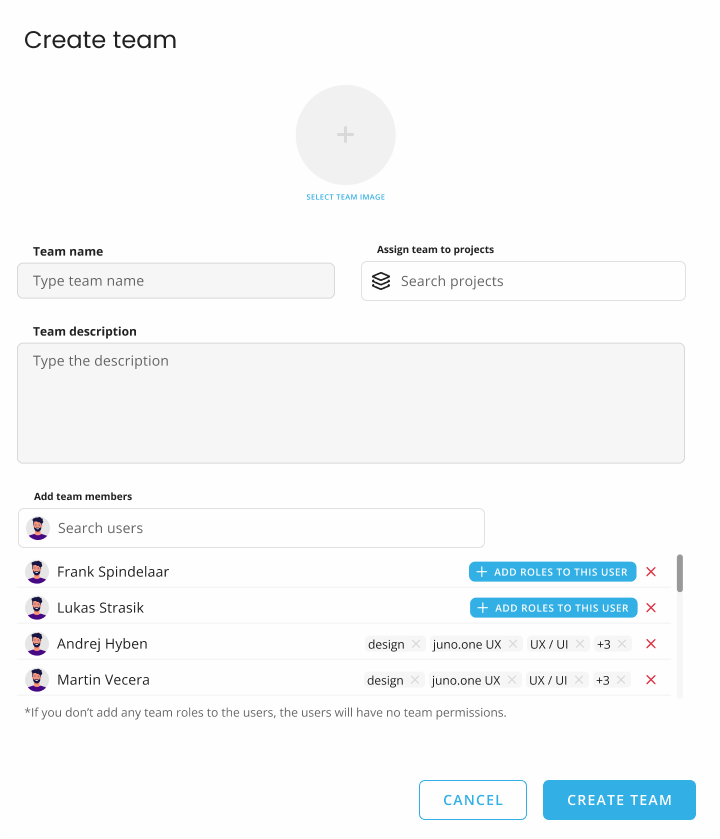
You will be able to provide the following details during the Team’s creation:
-
Enter your new team's name
-
Assign the team to a project (projects),
-
Write the teams’ description,
-
Add team members to the team (through the search bar),
-
Add unique team roles to the team members.
Note: if you don’t add any team roles to the users, the users will have no team permissions.
To confirm the inputs, hit the “Create Team” button, or revoke the changes by hitting the “Cancel” button.
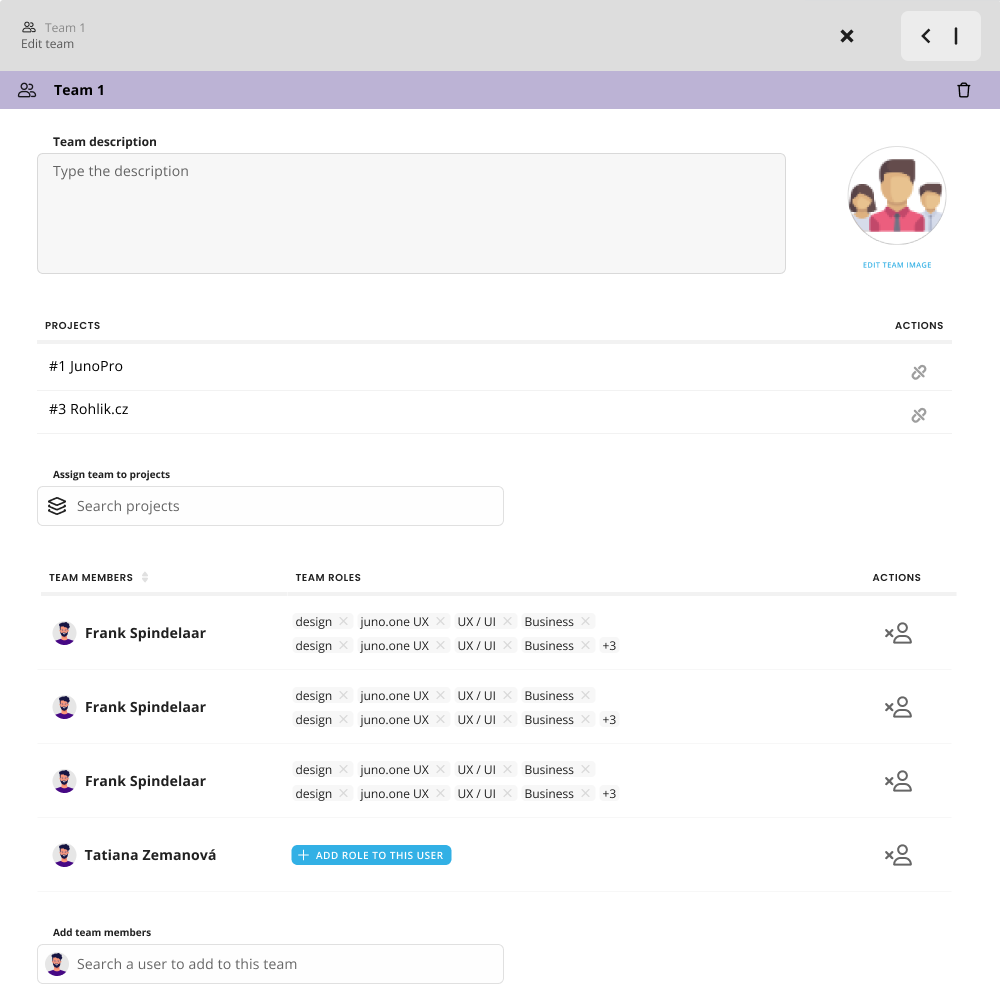
Editing a team
User with given permissions can also adjust an existing team (change the description, assign / remove a project, assign/remove team members, or delete the whole team); to do so, the user has to select an existing team in the Teams tab click on its name do the changes in the side window.
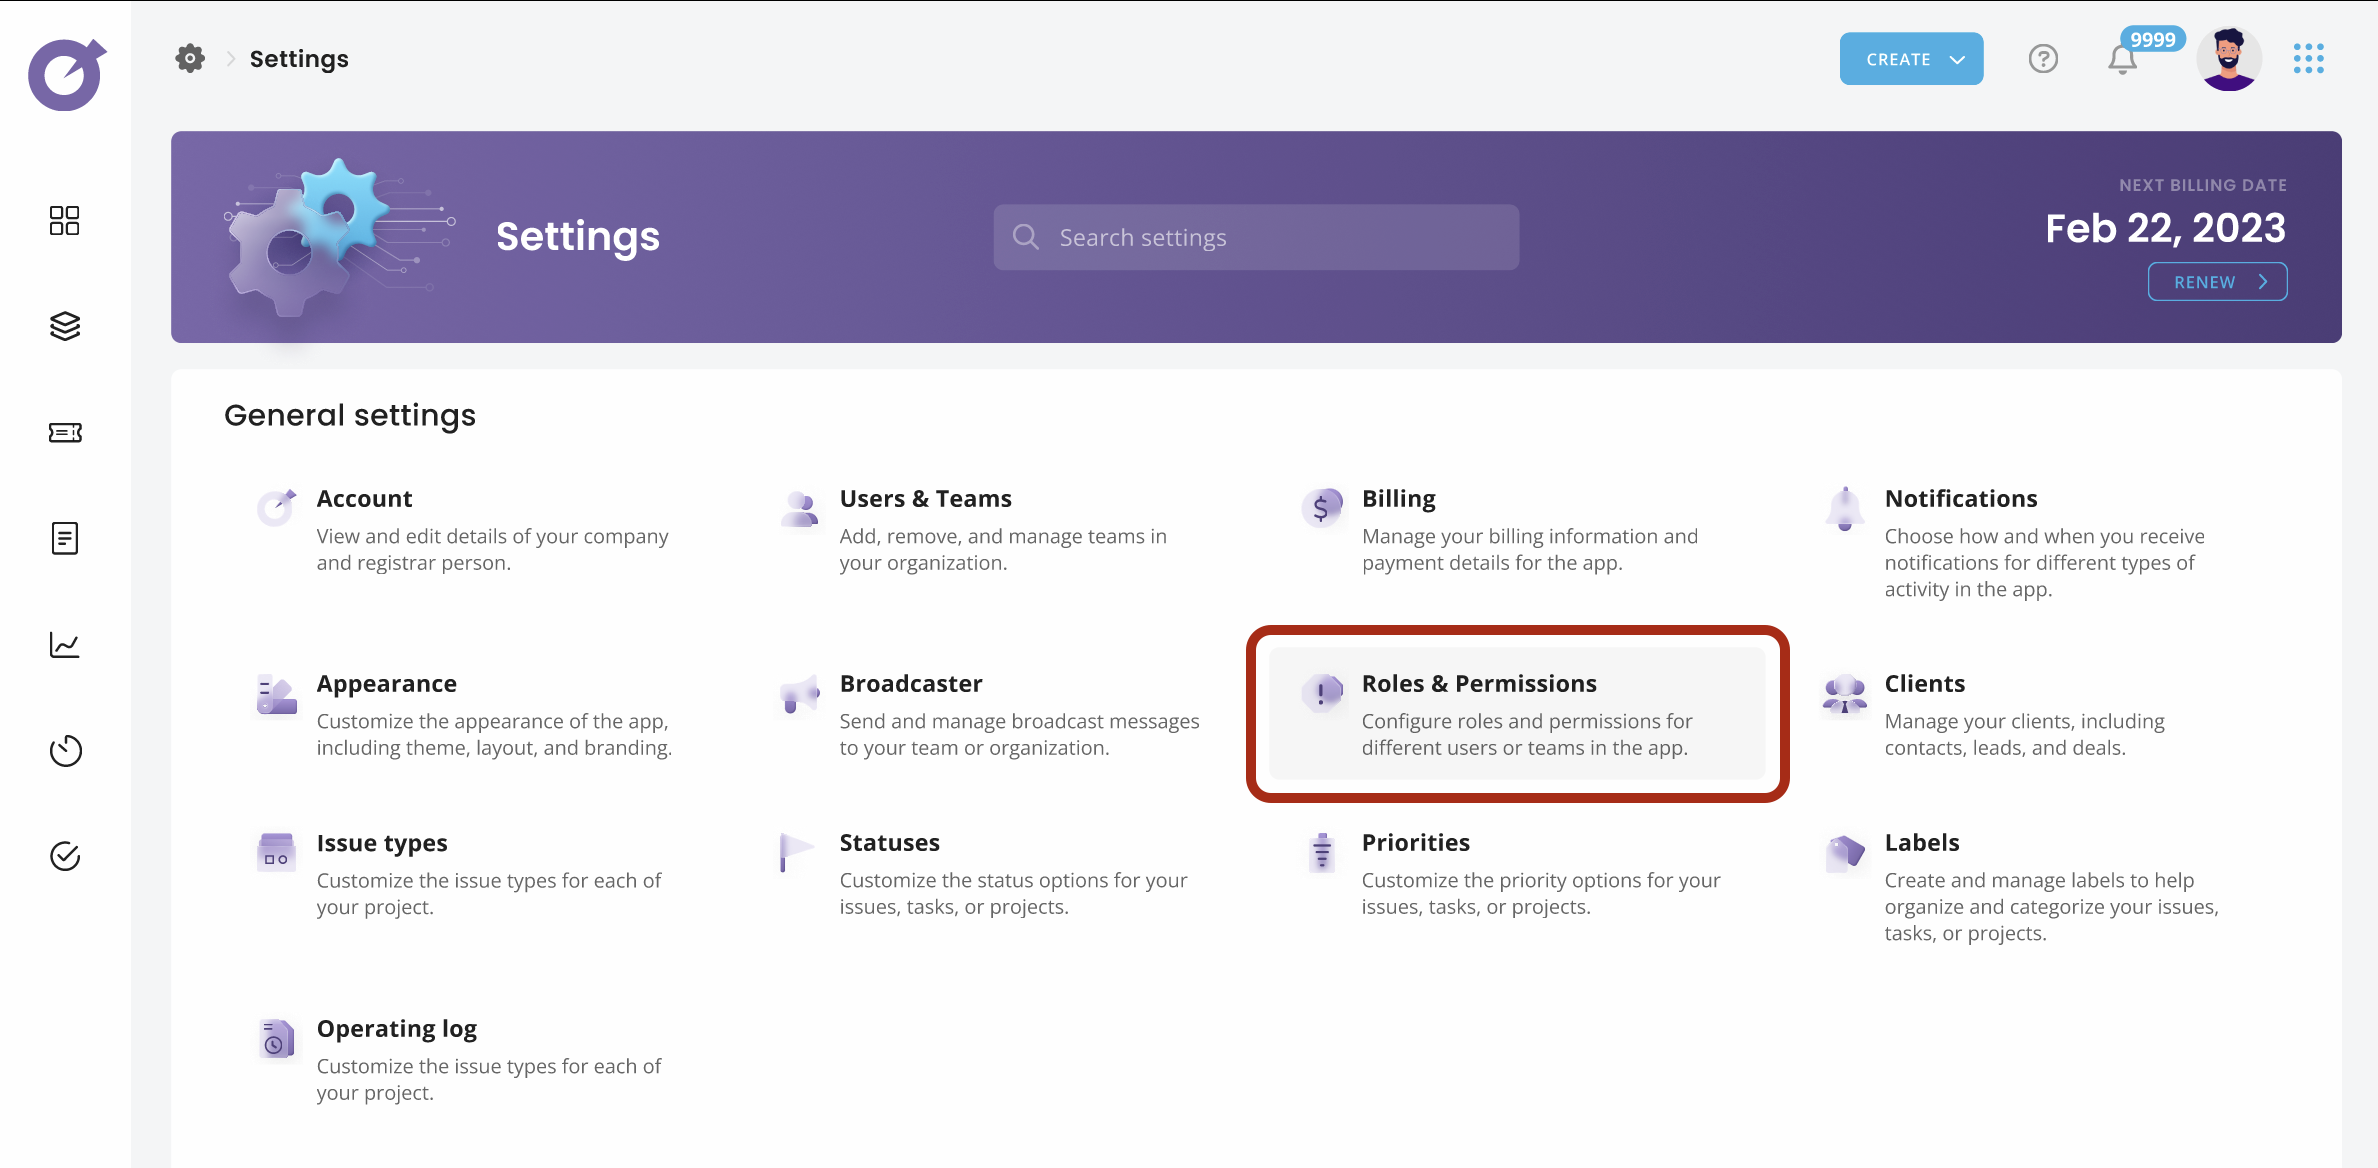
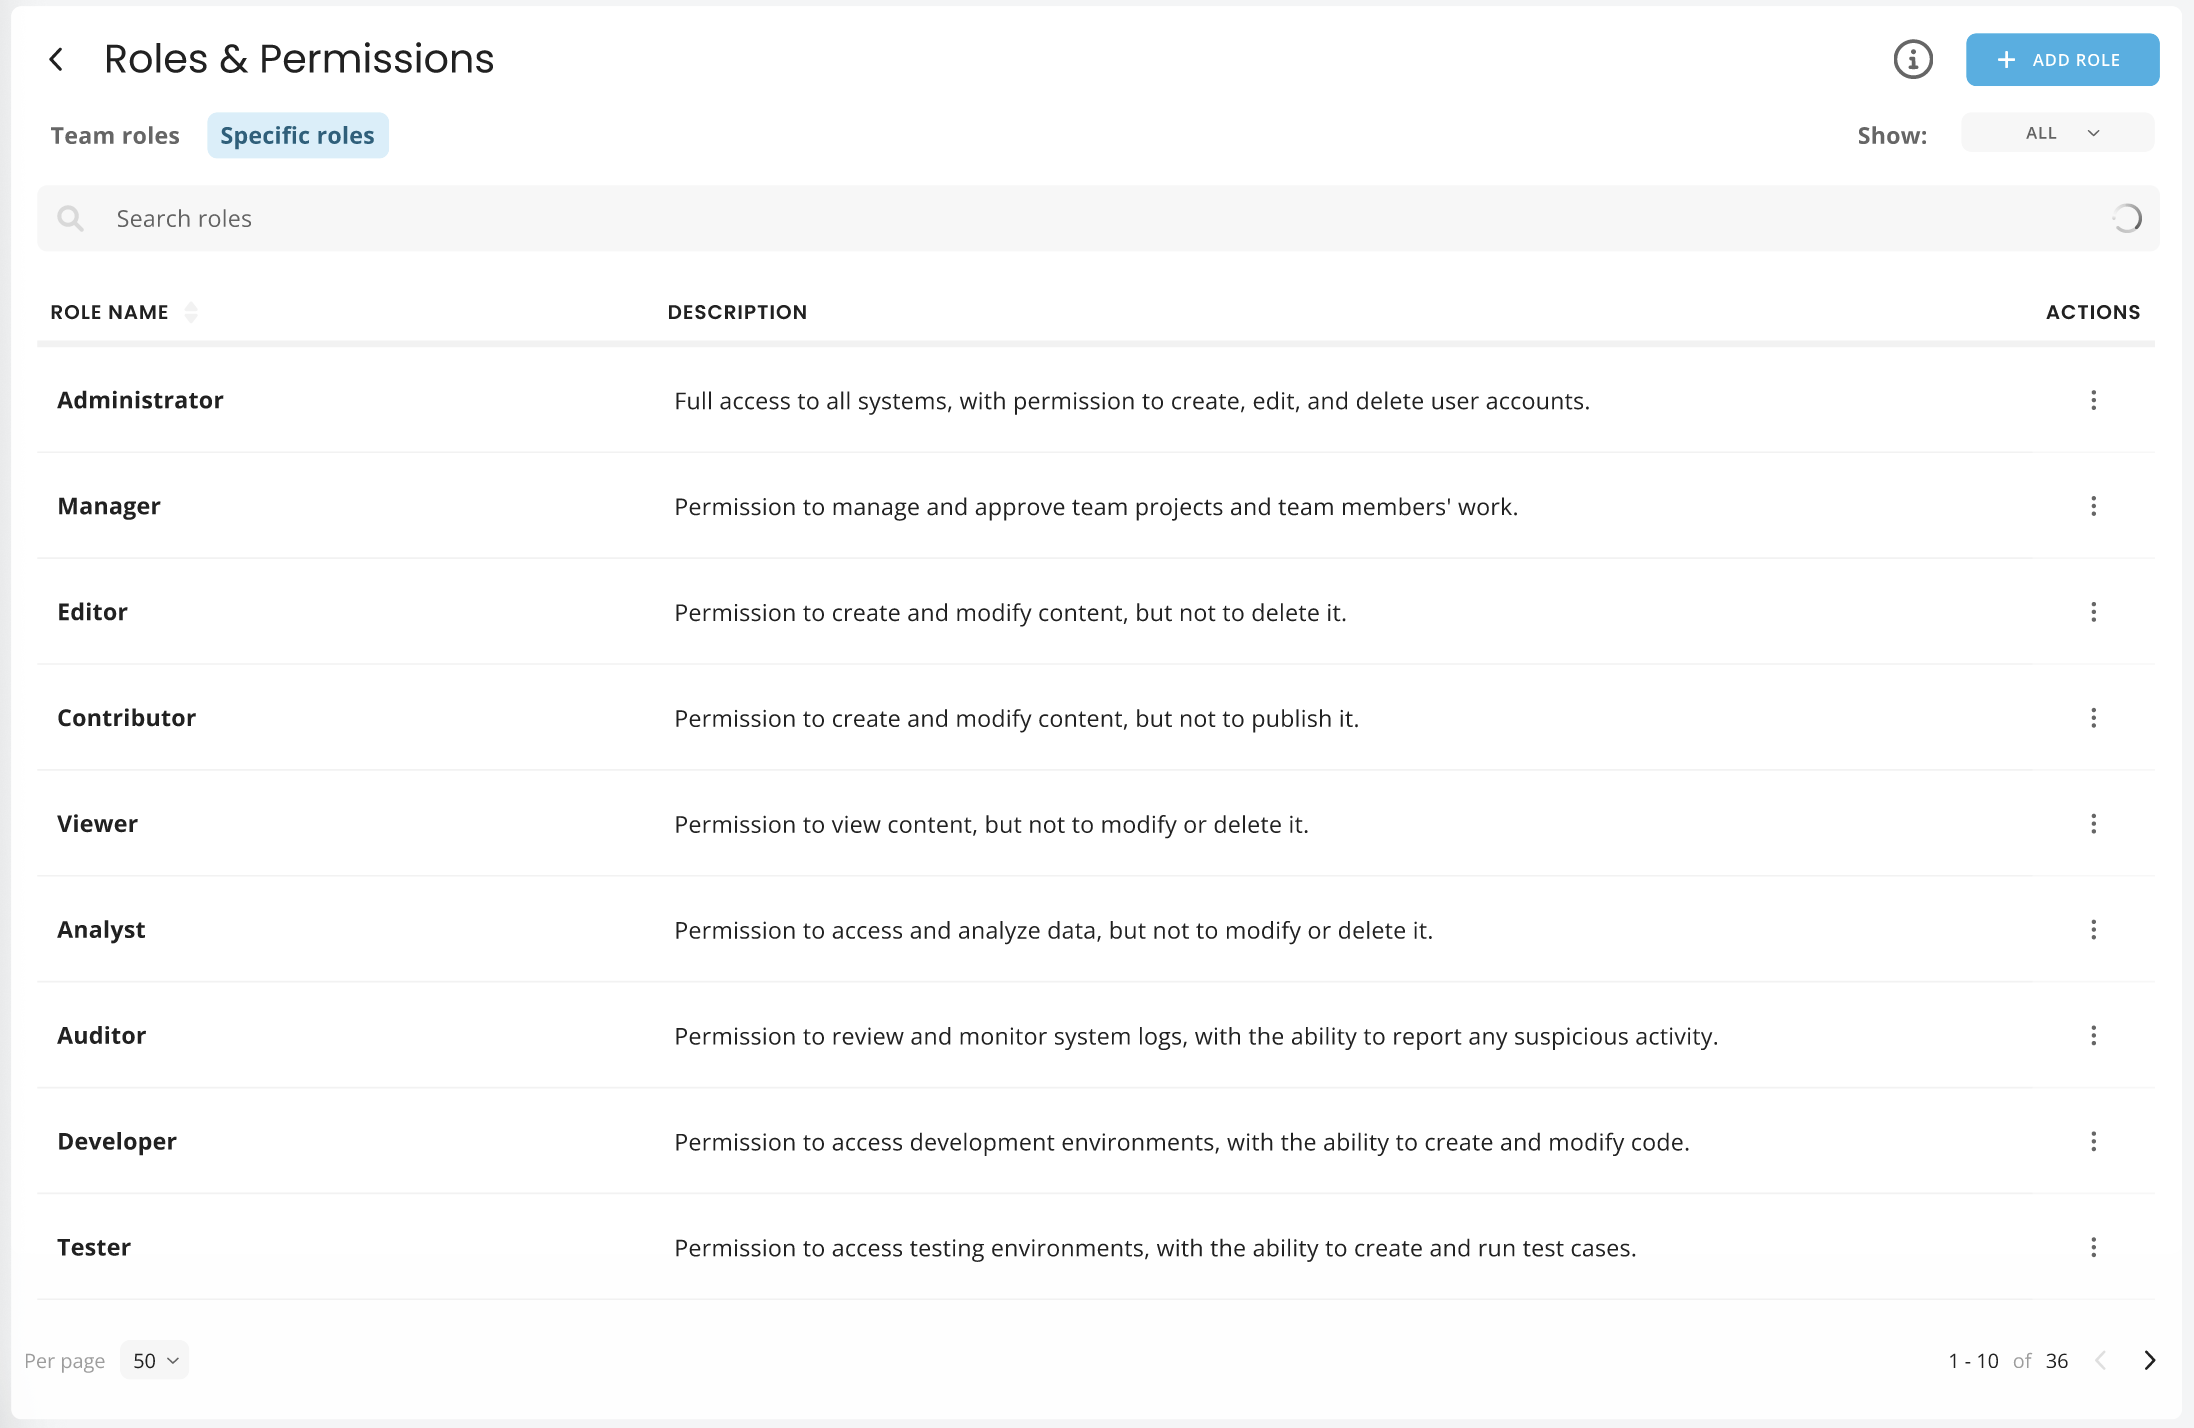
Roles & Permissions
Access, editing, viewing, creating, deleting and all the other actions are controlled by permissions. Permissions are set up within roles, which have two main types - team and specific. There's also the Super Admin, who is the owner of the juno.one instance and has all the permissions.
Currently, the business logic is designed as follows:
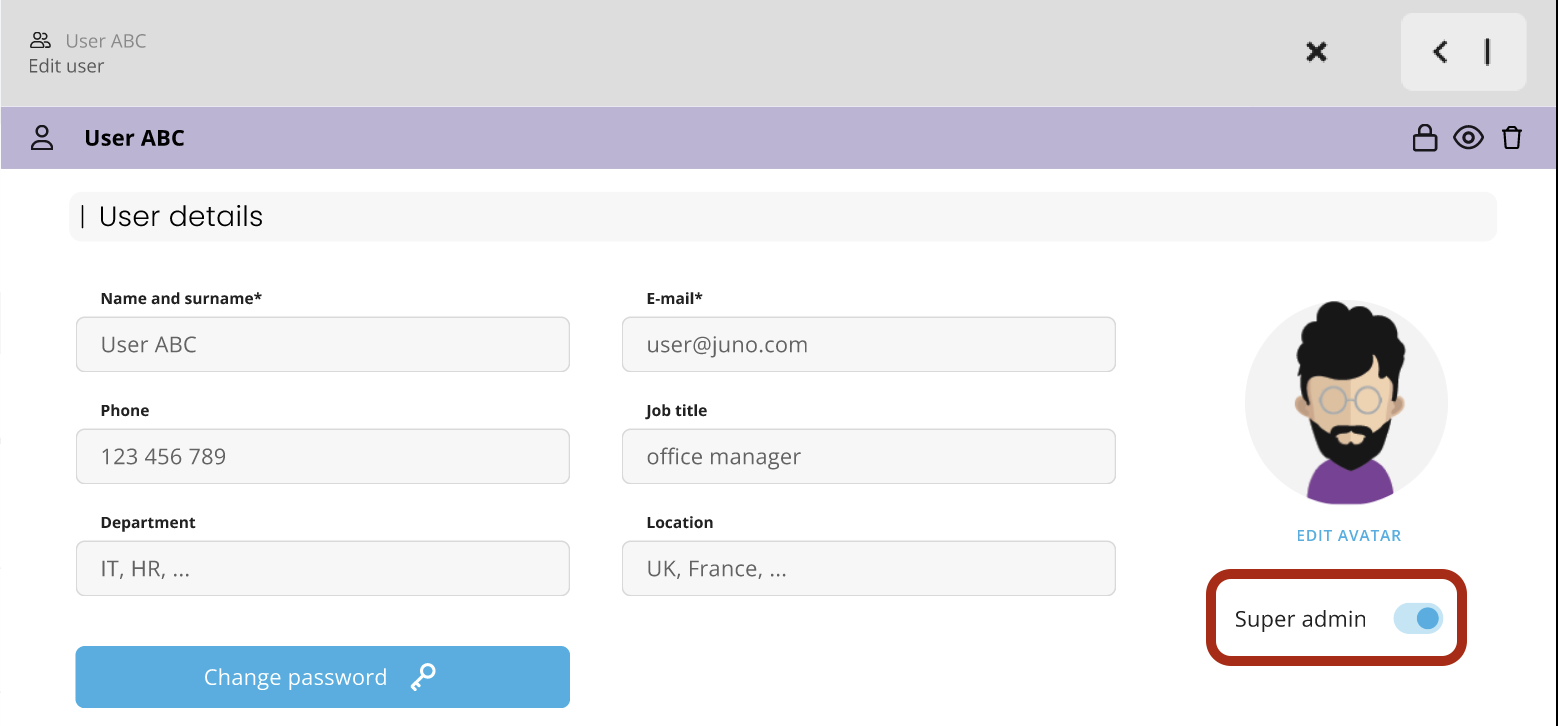
- The Super Admin is above all users, and is the owner of the juno.one instance. This user can then distribute the Super Admin role to other users, or create an Admin role with assigned permissions - more on that here. The Super Admin has access to all juno.one features by default. The Super Admin role can be granted by turning on the Super Admin switch on a user's profile detail:
-
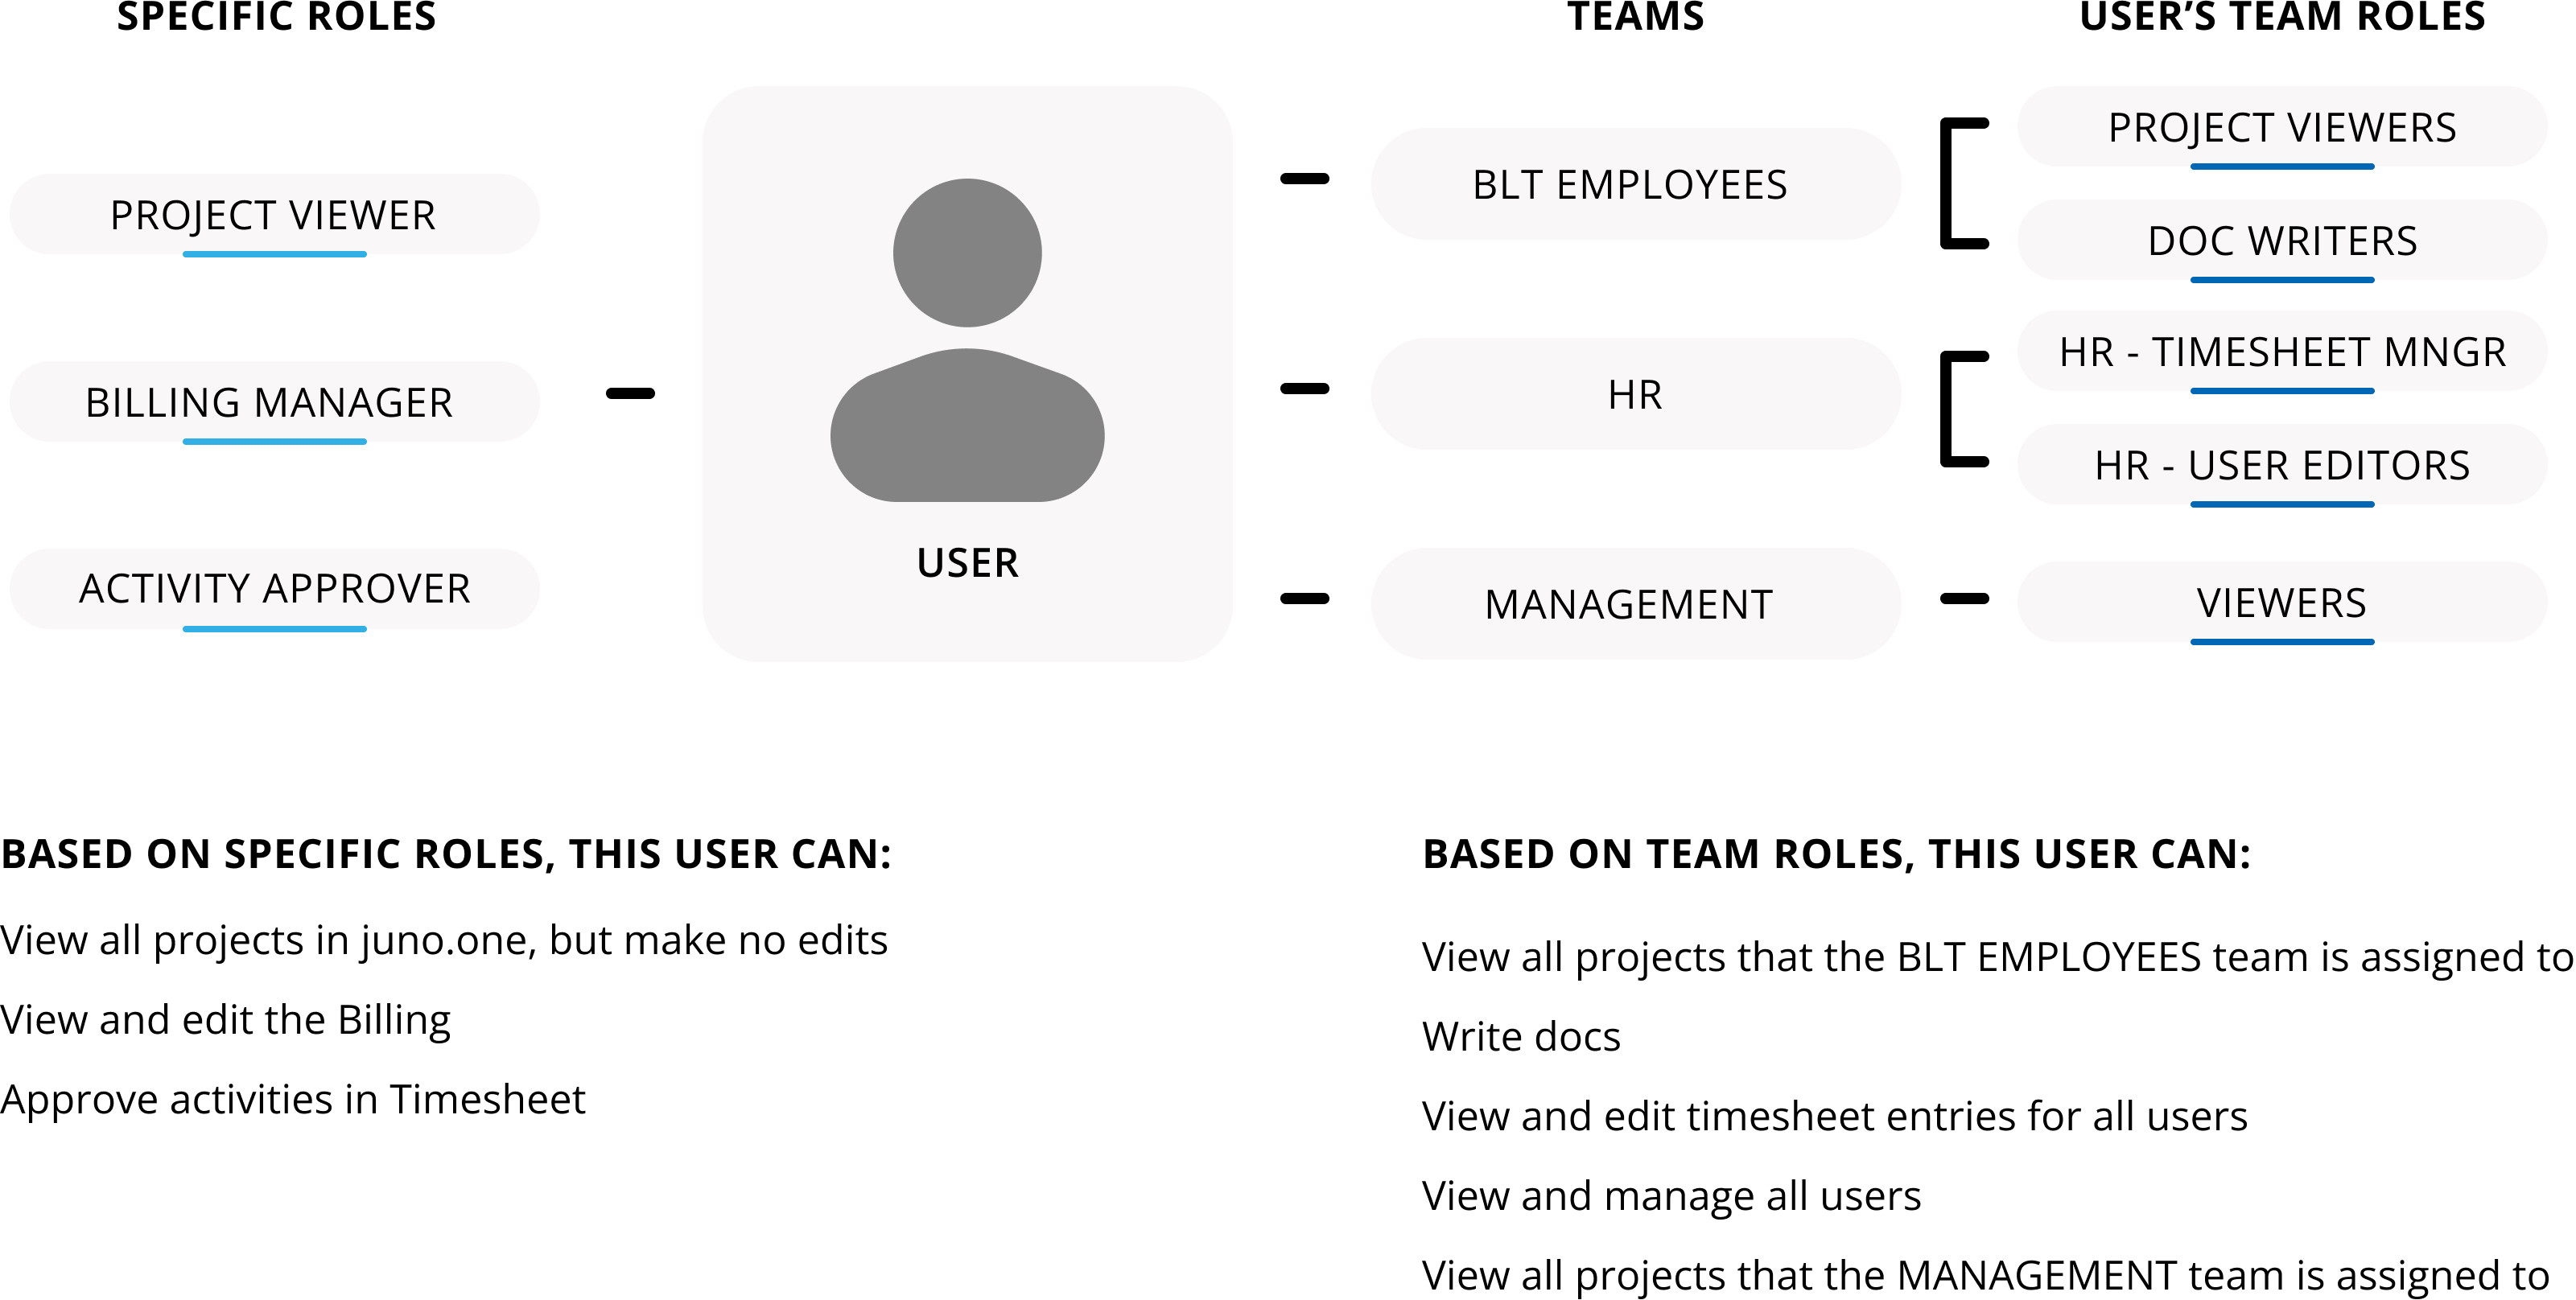
Specific roles define the general access and administration of the juno.one system, and are assigned to users regardless of teams they're in. Some examples of a specific role can be: Editor, Viewer, Team Activity Approver, Planner, Project Editor, Project Admin, Juno Admin, Timesheet Admin, etc.
-
Team roles include the team-based permissions, usually related to working within a specific project or a module. Some examples of a team role can be: Project Owner, Developer, Tester, HR, Designer, Marketing, Security specialist, Scrum Master, etc.
Here's an example of the Team role / Specific role system and how it's tied to a user:
Note: There are no pre-defined roles in juno.one. Once you set up your juno.one and want to start working with other users, you will need to define team roles and specific roles, create teams, and assign the users into the teams.
You will also need to equip each user with a set of specific roles, and a set of team roles within their teams in order to clearly define what each user can or cannot do within the application.
To manage team roles and specific roles, hit the Roles & Permissions item in the Settings menu:
Team roles
In the Team roles table, you can view the Team role name and its short description.
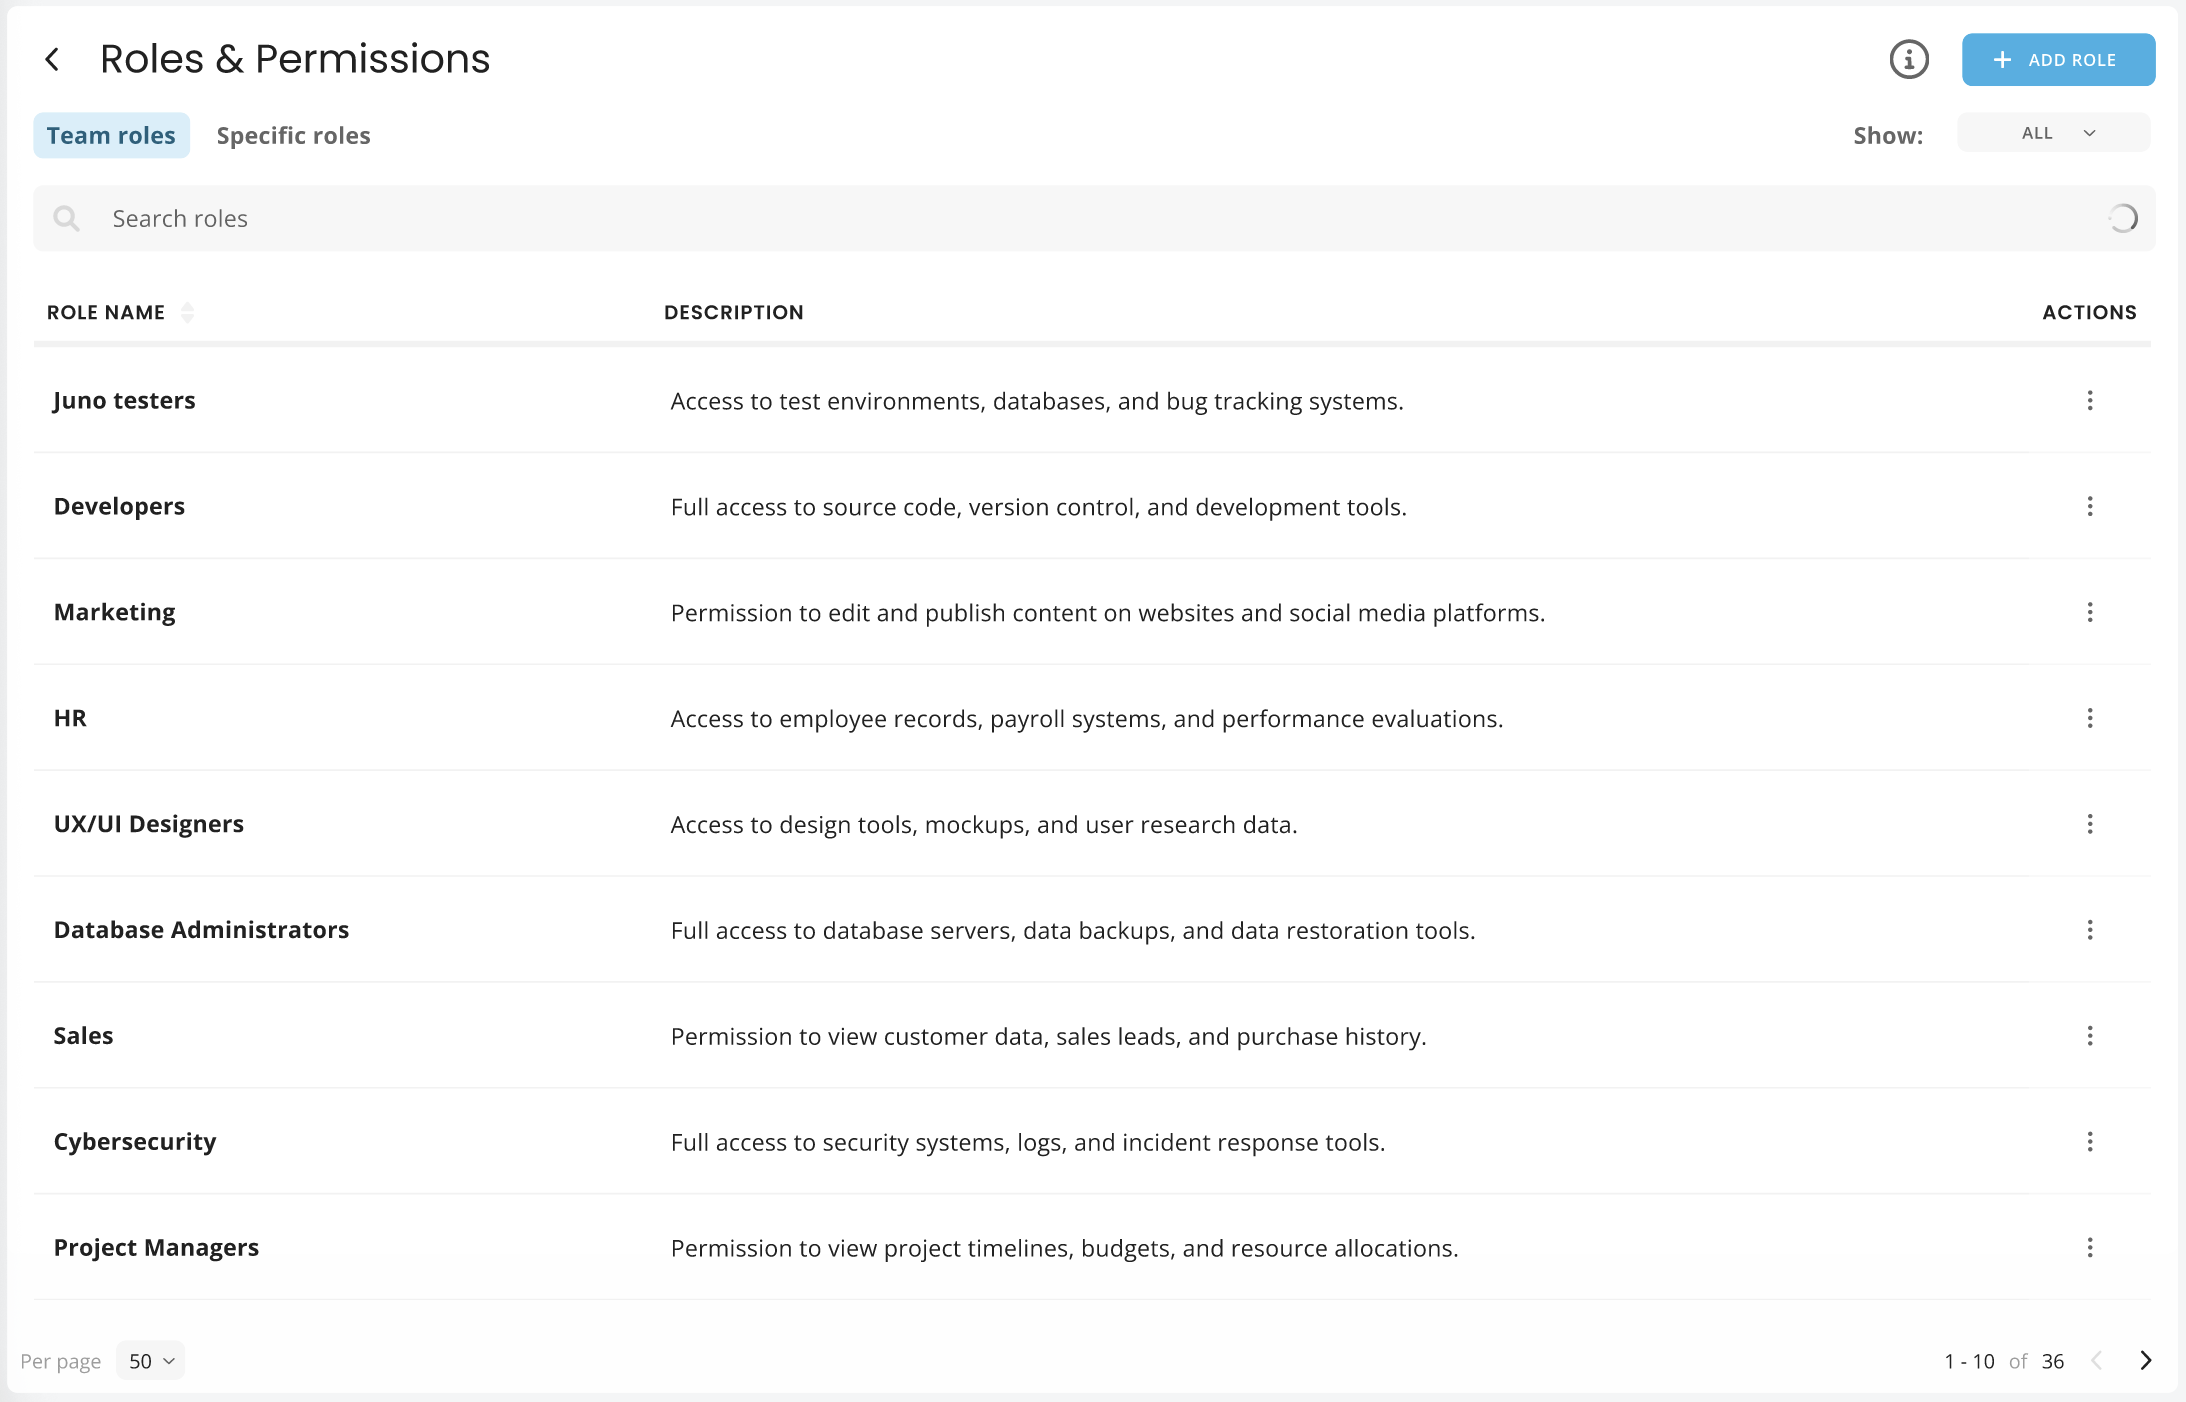
Creating a new role
A new role can be created by clicking on the + New role button. A pop-up window will appear, where you need to fill in the following information:
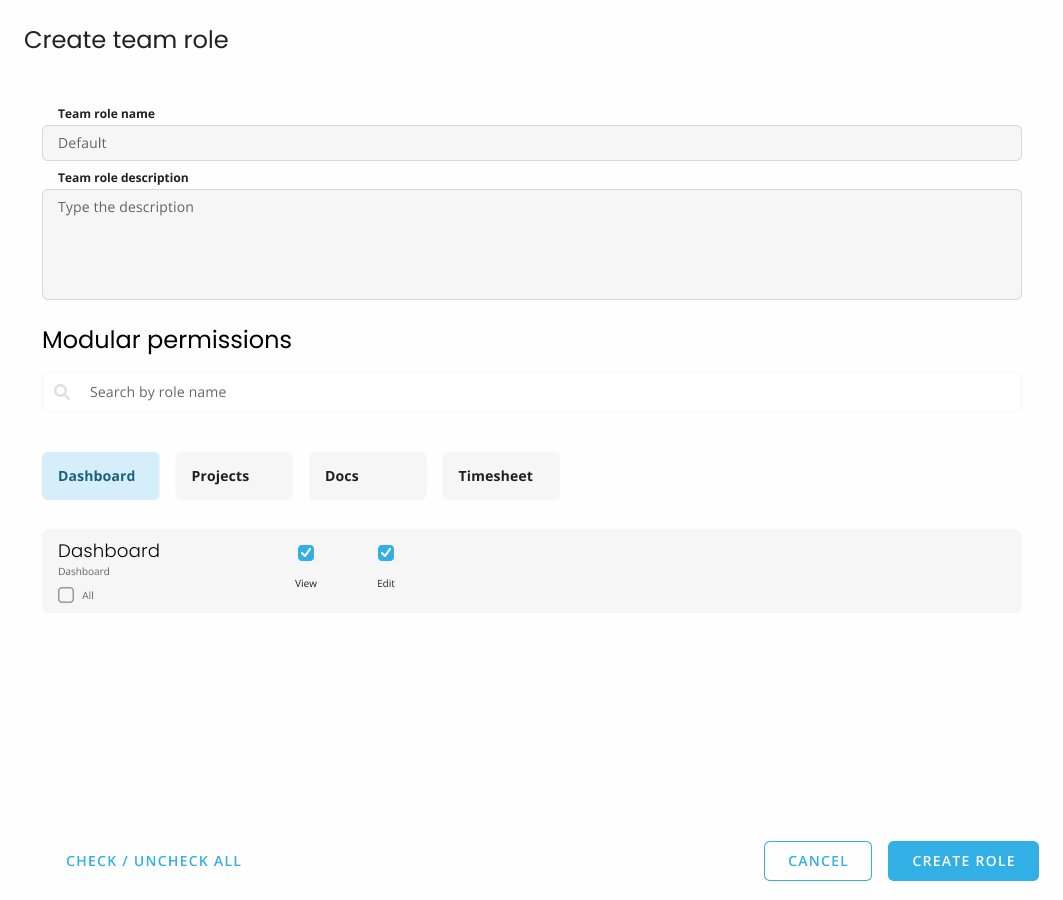
-
Team role name
-
Team role description
-
Set up the modular permissions
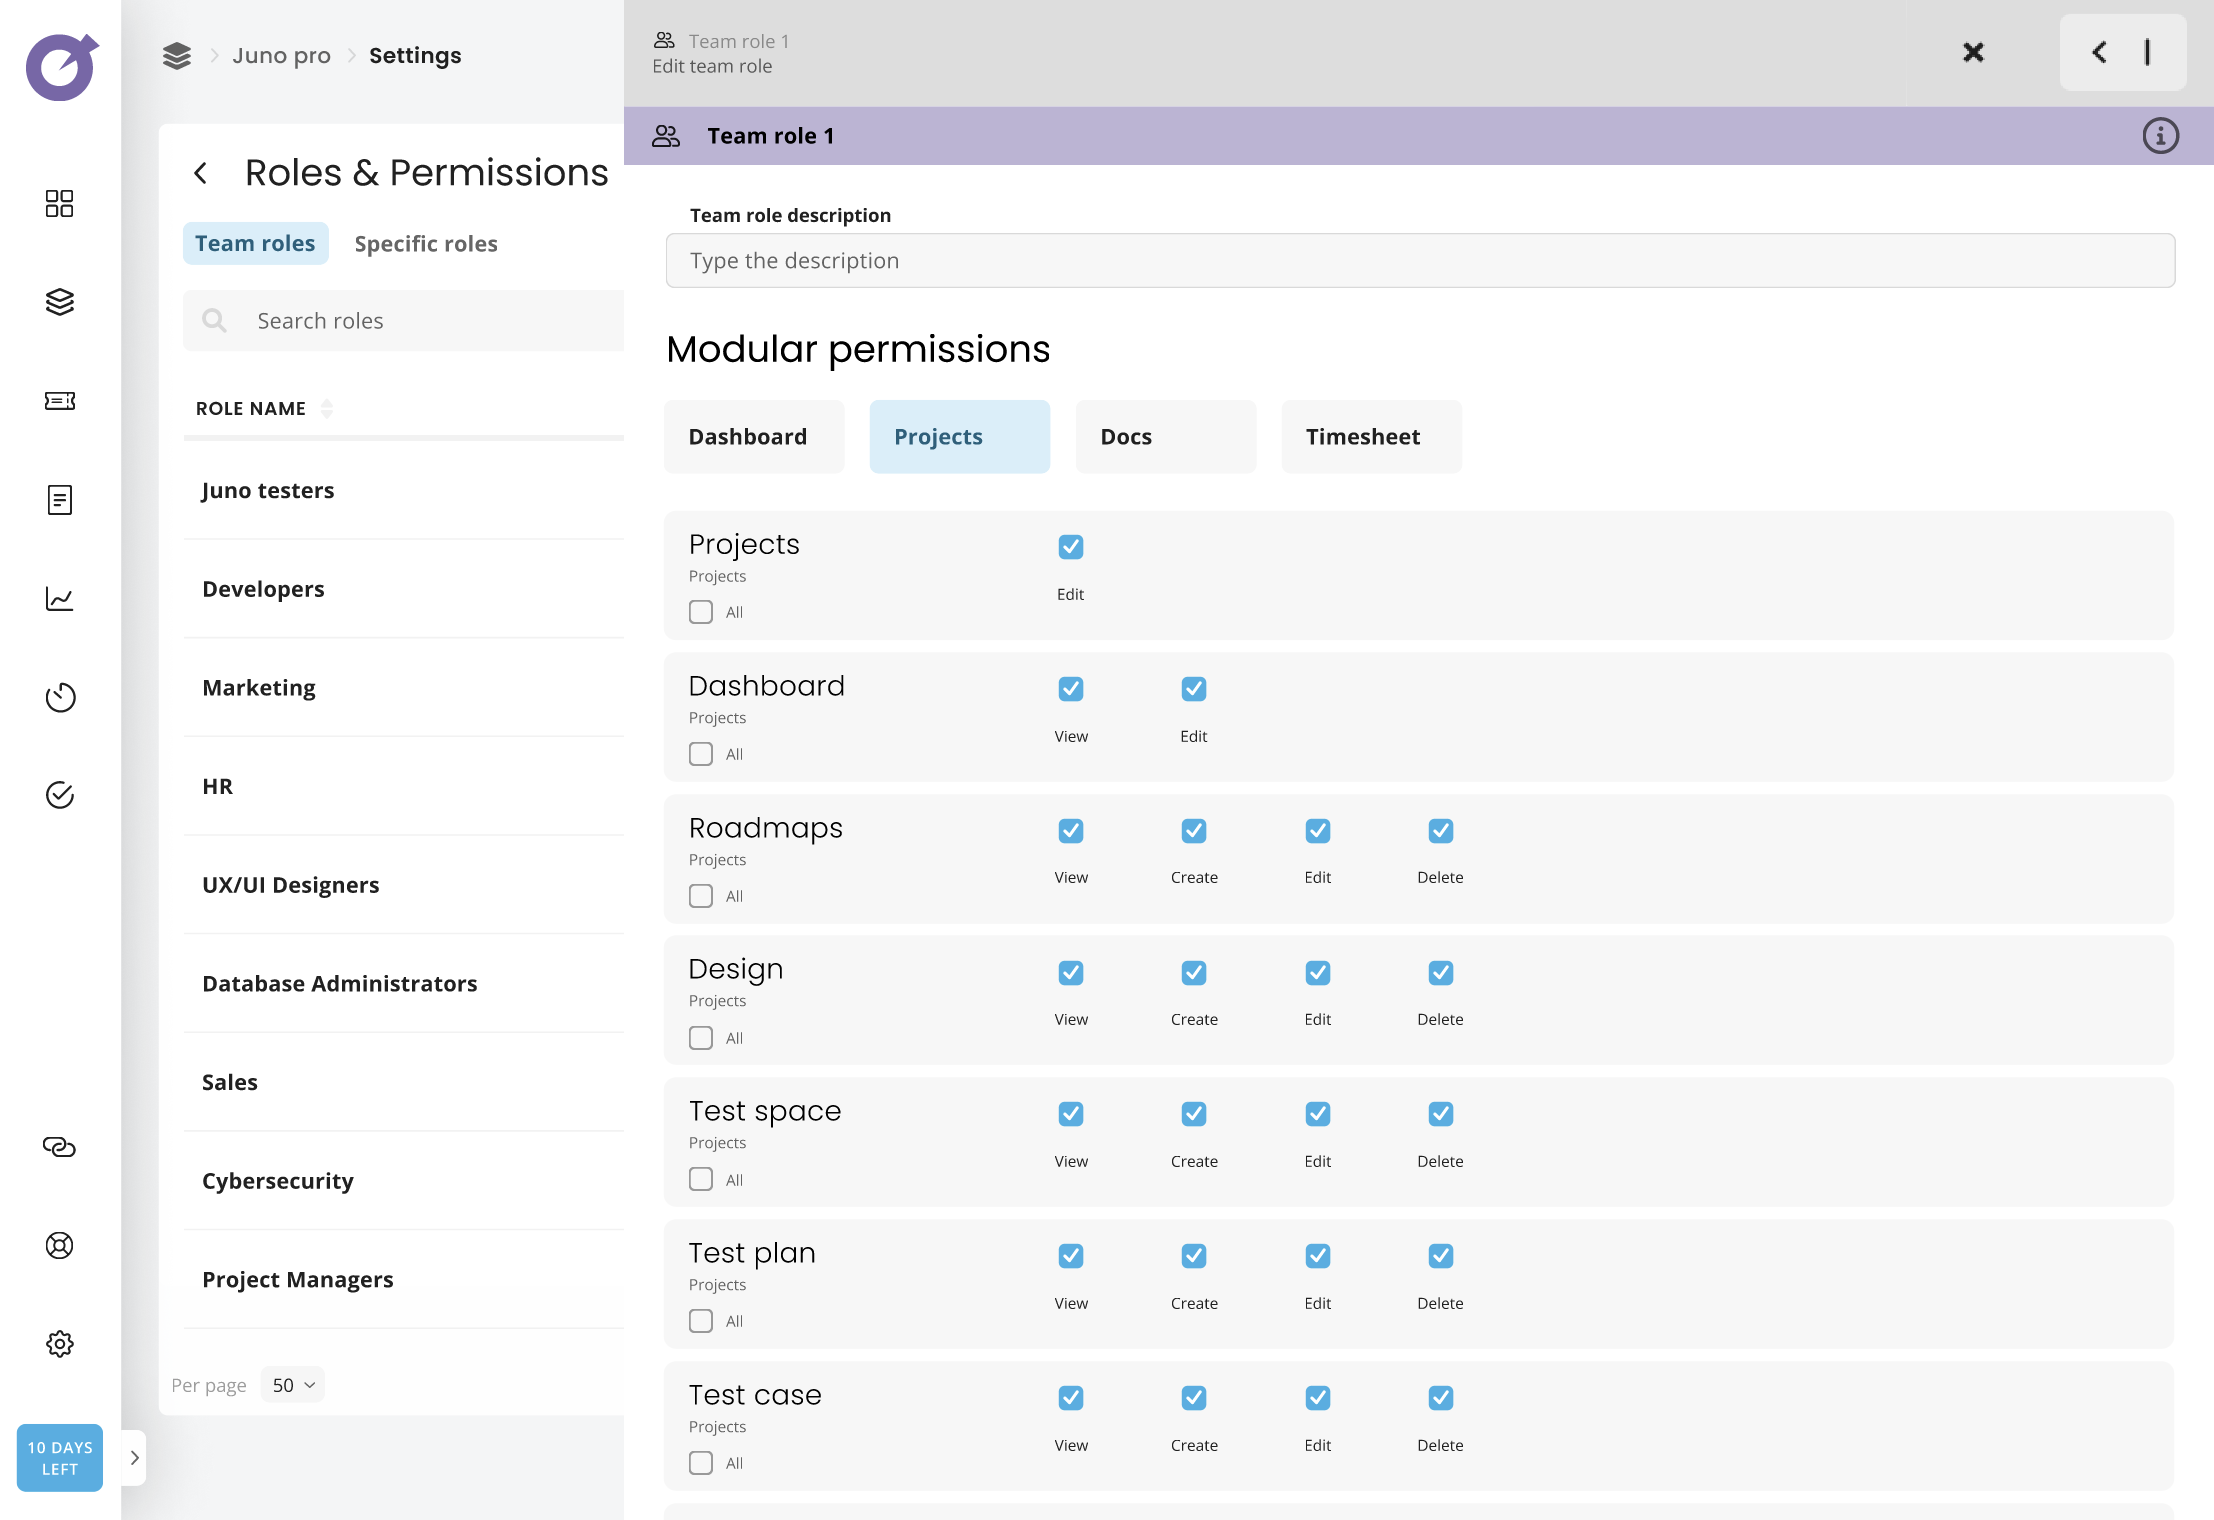
Team role permissions
Here's a list of all the team role permission types:
-
View
-
Create
-
Edit
-
Delete
-
Approve (non-working) activity
There's a set of permissions for each module and sub-module where team access is necessary, which lets you as the (super)admin decide who can view, create, edit or delete items in the given module and sub-module, and also who can approve non-working activities in Timesheet. These permissions are team-based, which means that a team needs to be assigned to the module / sub-module or entity, in order to have access to it.
The level of access is then set up by the particular permissions.
Editing a team role
Only (super)admin with the given set of rights can view the roles and make adjustments. By clicking on the name of the team role on the Team role tab, you get a side window where you can see the current set up of the team role and make any required adjustments.
Specific roles
In the Specific roles table, you can view the Specific role name and its short description.
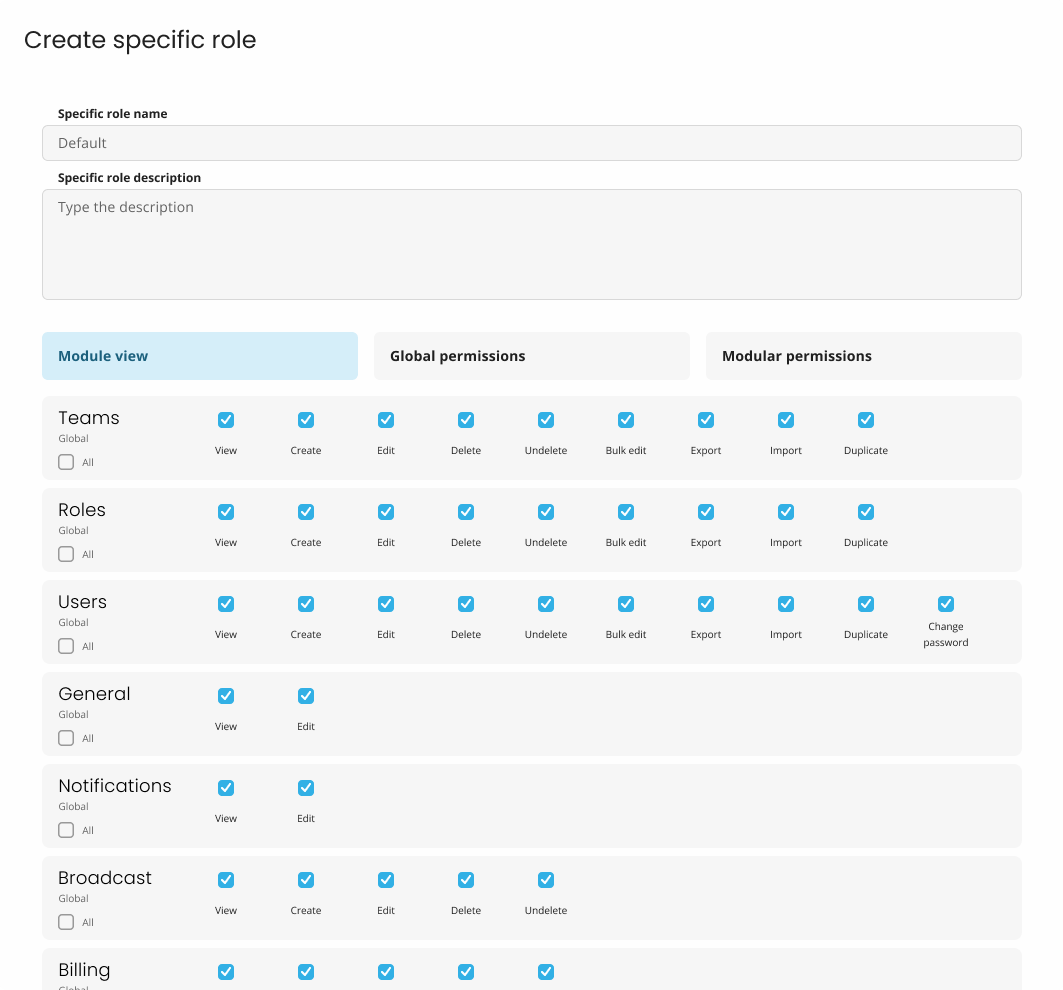
Creating a new role
Same as with team roles, a new specific role can be created by clicking on the + New role button. A pop-up window will appear, where you need to fill in the following information:
-
Specific role name
-
Specific role description
-
Set up the module view permissions, global permissions and modular permissions
Here's a list of all the specific role permissions: - Module view: view
-
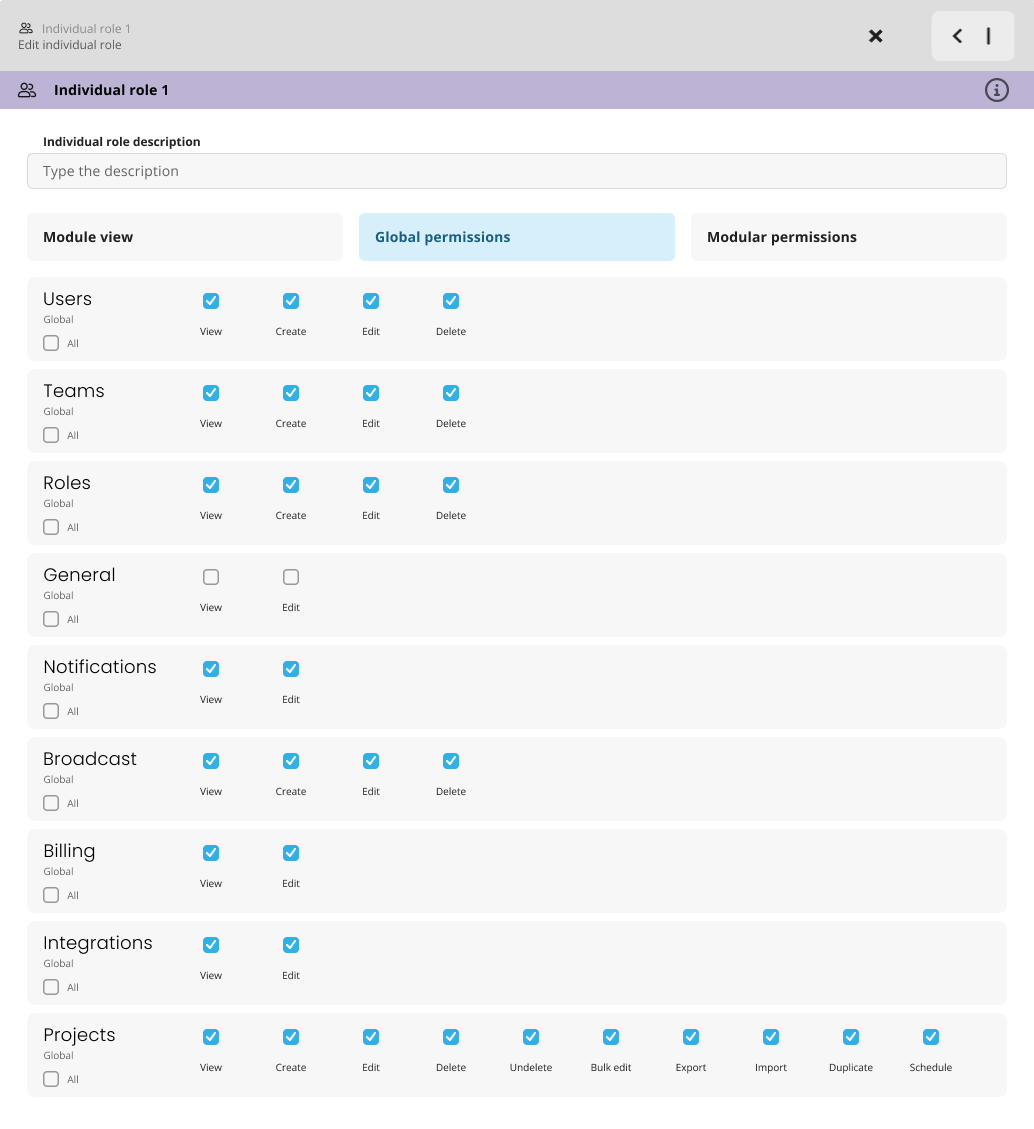
Global permissions: view, create, edit, delete, undelete, bulk edit, export, import, duplicate, schedule
-
Modular permissions: view, create, archive, close, approve
The module view permission allows the user with this specific role to view the module in their main menu.
The global permissions allow the user with this specific role to view and manage users, teams, roles, general settings, notifications, broadcast messages, billing, integrations and projects.
The modular permissions allow the user with this specific role to view and manage projects, docs, and approve all timesheet activities (working and non-working).
The level of access is then set up by the particular permissions.
Editing a specific role
Only (super)admin with the given set of rights can view the roles and make adjustments. By clicking on the name of the specific role on the Specific role tab, you get a side window where you can see the current set up of the specific role and make any required adjustments.
Types of permissions
Current modules with permissions set are Project, Docs, Timesheet, Settings and General (for viewing modules).
Project
View - Allows user to preview projects and their details. (Note: User can only see Projects he is assigned to if this permission is not enabled.)
Add - Allows user to create new Projects and add new entities to the current ones.
Edit - Allows user to edit already created projects and its entities.
Delete - Allows user to delete a Project and its entities.
Archive - Allows user to change Project state to Archived
Close - Allows user to change Project state to Closed.
Execute - Allows user to execute Test cases and Test Plans
Bulk copy - Allows user to use the Bulk copy feature
Docs
View - Allows user to view the Docs module
Add - Allows user to create new content in the Docs module
Edit - Allows user to edit the content of the Docs module
Delete - Allows user to edit the content of the Docs module
Timesheet
Approve - Gives user permission to approve Timesheet requests created by other users
Settings
View - Allows user to view Settings module and its various entities
Add - Allows user to create new content in Settings module (Teams, Role, Users)
Edit - Allows user to edit the content of the Settings module
Delete - Allows user to delete the content of the Settings module
Archive - Allows user to change the User state to Archived
Lock - Allows user to change the User state to Locked
Impersonate - Allows user to switch to another User's account and check their actions and permission from their view
General
View - Allows user to view the juno.one modules on the main page
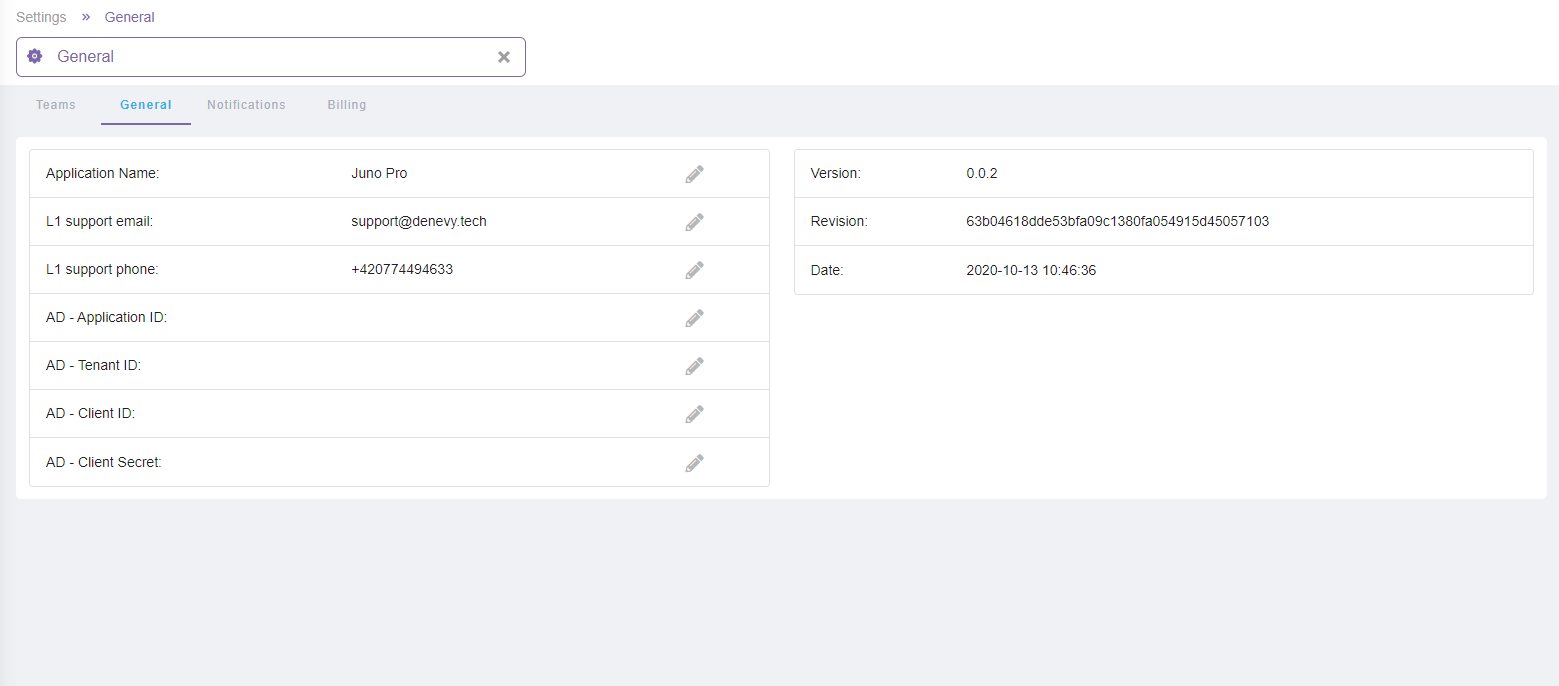
General
From the General settings screen you can control the most basic configuration of your juno.one account.
This page also includes information about the current version of the juno.one application. You can read more about the latest versions on our Canny profile.
Notifications
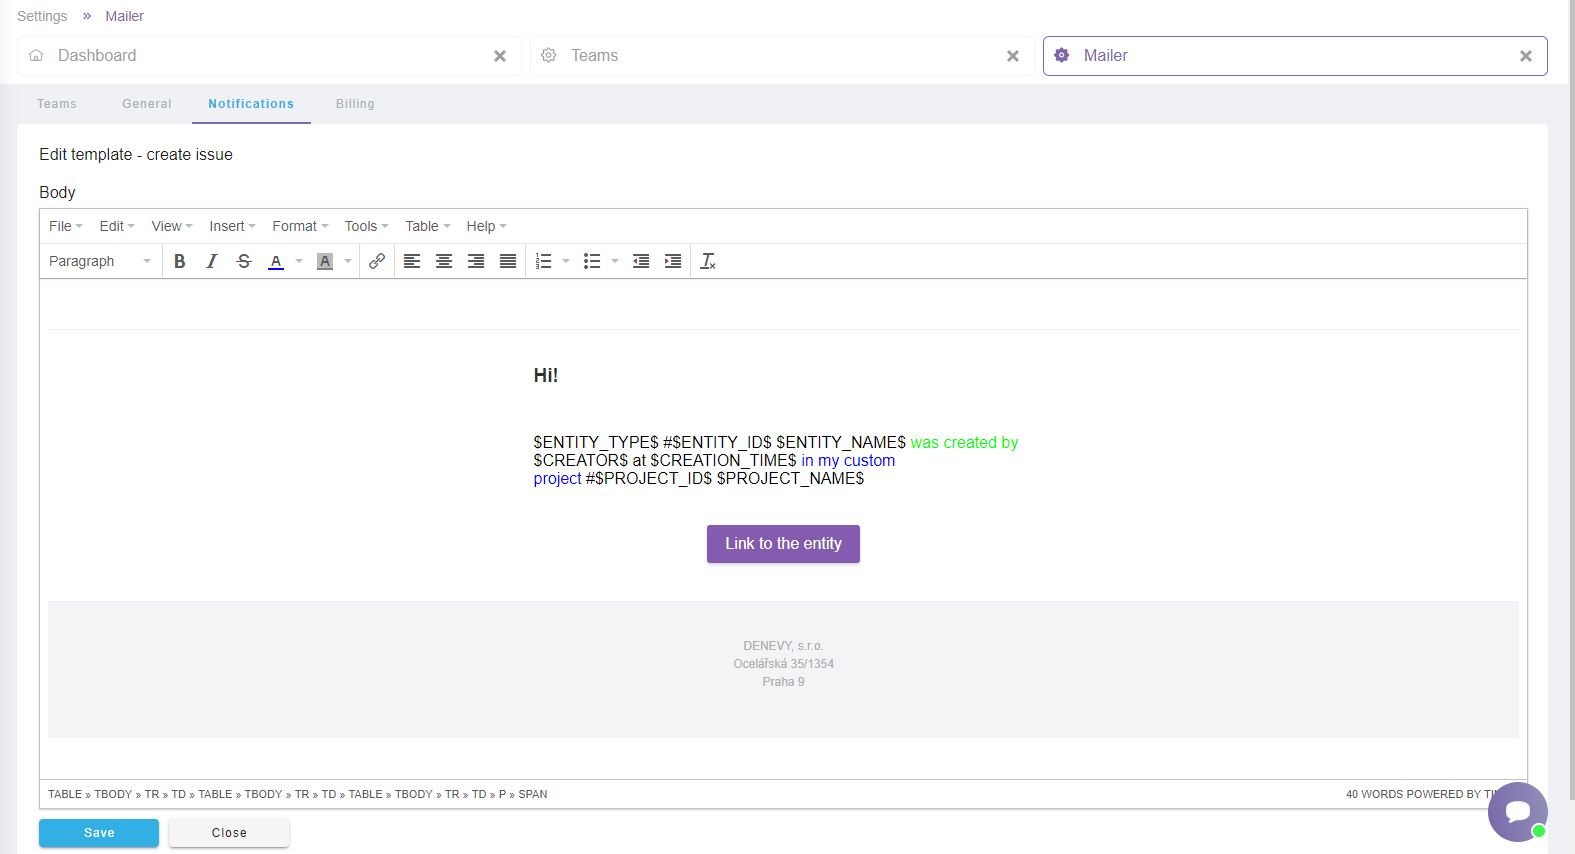
In the Notification settings you can configure the design and content of the notification e-mails.
For each module there is a set of actions that are sending e-mail notifications to all selected participants when any of these events occur.
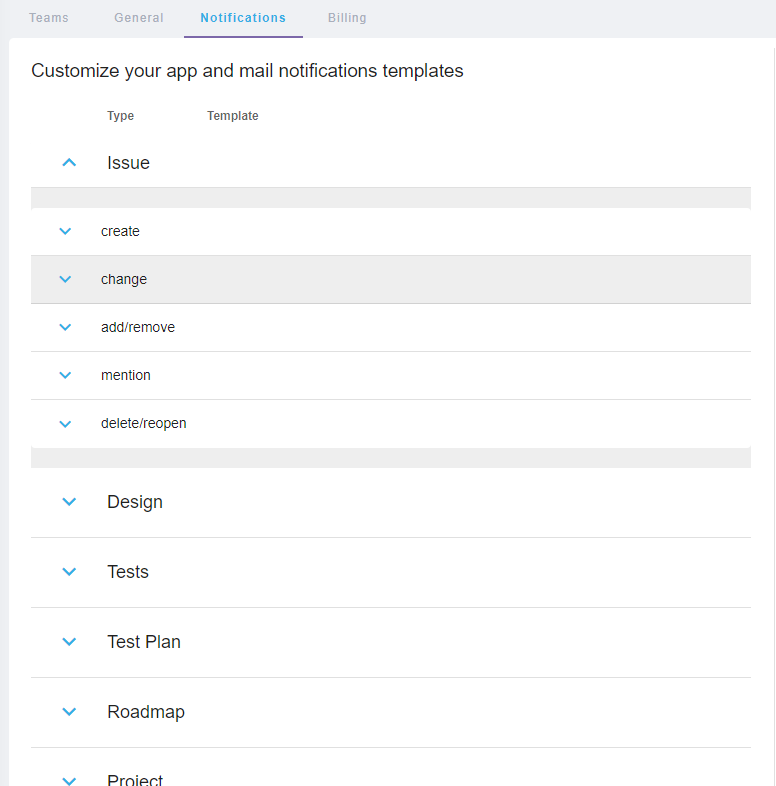
Note that elements such as lower case text, background color, pictures and logos are customizable, but default placeholders (elements marked with # and $ ) are mandatory, and should not be deleted.
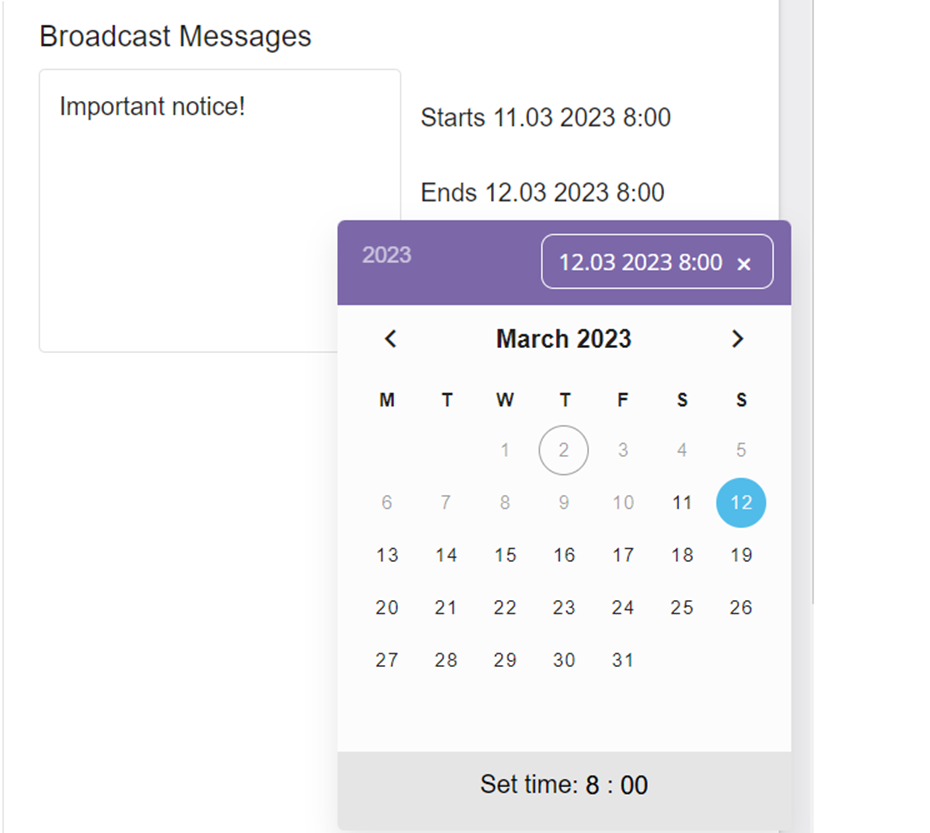
Broadcast messages
Broadcast messages service allows user with admin permission to send message to all users of the current juno.one instance to their notification pop-ups.
This feature is useful when e.g. there is system update scheduled to notify all user in advance.
Billing
Your payment settings and history can be viewed in the Billing tab. In the Subscription plan section you can see your current subscription plan.
When subscribed, you are automatically charged once per billing period on the date your signed up for your subscription.
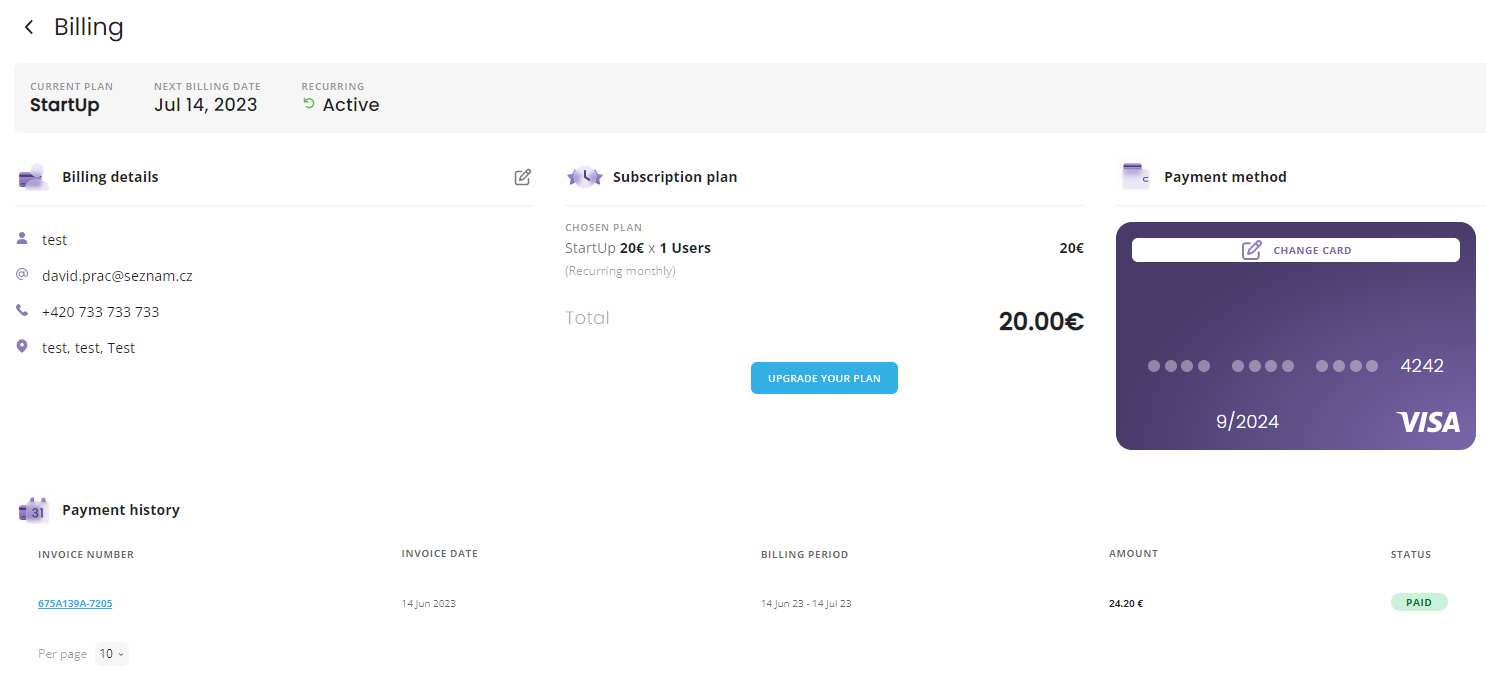
If you want to adjust your current plan, click on the Upgrade your plan button.
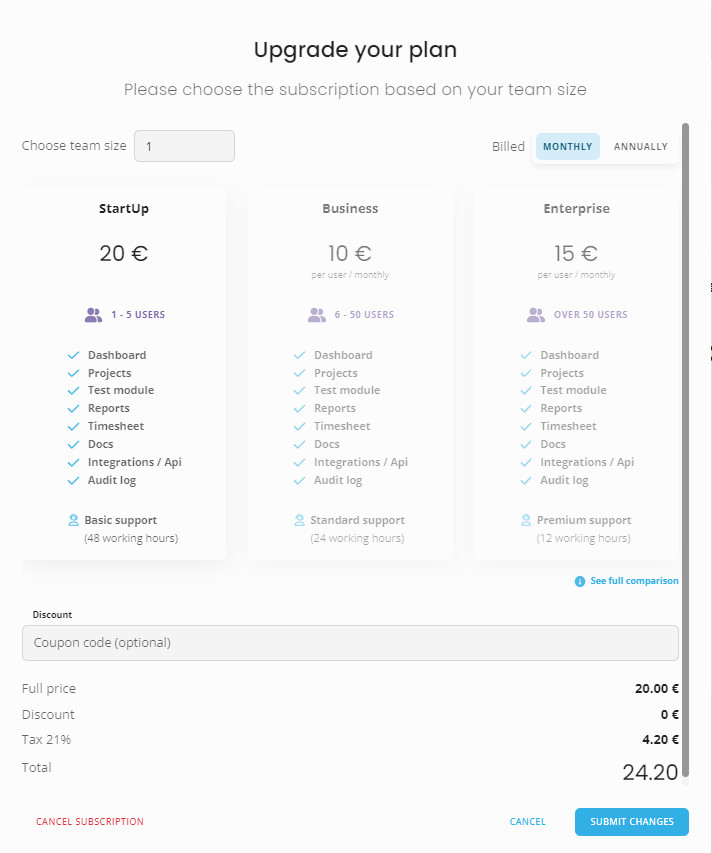
In the Subscription plan form you can change number of employees using juno.one. Please be aware that on our free trial version, you will be able to create only 5 users.
The number of participants directly affects which Edition is selected for your project.
You can change your billing period from monthly to yearly and vice versa.
In this screen you can also redeem any discount coupons you have.
Billing details includes all personal information you provided when your subscription was established. If you want to update it, click on the Edit button (pen). You can change whether you want your subscription to be billed to your company or to a person.
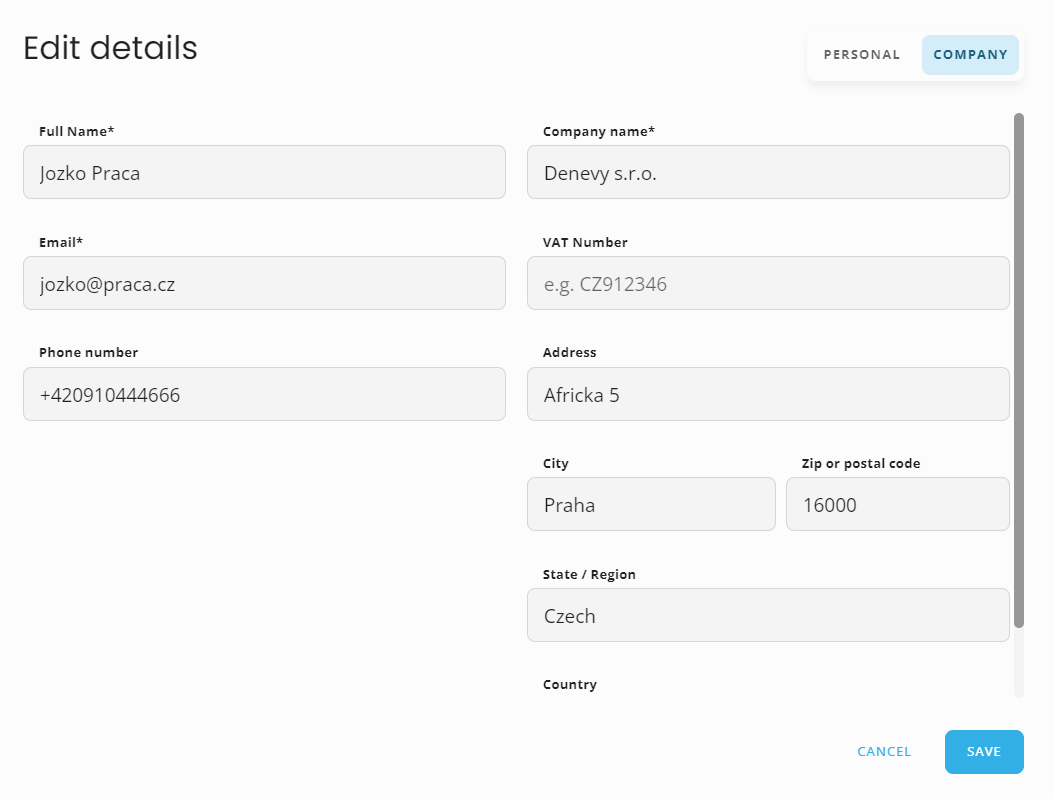
If you choose for your subscription to be billed on your company, you need to add your VAT or IČ DPH.
Click on the Save button to confirm all changes.
Note that if you fill in a valid VAT number of a EU company, you will be exempt from 21% Value Added Tax. Not applicable for companies registered for Czech VAT and non-EU countries.
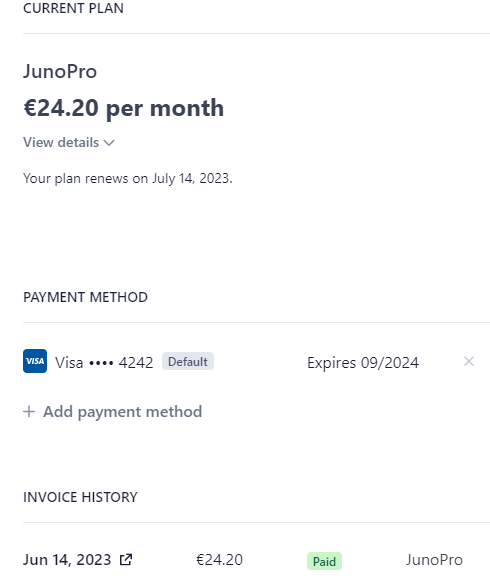
In the section Payment method you can see current plan, payment method and invoice history. You can edit, change or add new payment method.